
Cheap and Painless eGPU Thrills on a 2013 MacBook Pro
Dec 31, 2016 technology reviews
My late-2013 15” MacBook Pro’s discrete GPU — an NVIDIA GeForce GT 750M — was pretty good for gaming during the first year of its life. But around the time that the new generation of consoles dropped, AAA games on the PC started becoming unplayable, even at postage-stamp resolutions with the lowest possible settings. I lived on a strict diet of indie games from 2015 to 2016 — thank goodness for well-tuned titles like Overwatch and The Witness! — but the itch to try games like the new Mirror’s Edge and Deus Ex became too great. Initially, I thought it might be time to switch out my MacBook for the upcoming 2016 model, but the winter reveal wasn’t particularly tempting: CPU performance was about the same as mine and the GPU was — at best — 3 times as powerful. (Still need to see the benchmarks on that — educated guess.) Worth it for a few hundred bucks, but $2000? No way!
Building a gaming PC wasn’t an option due to my mobile lifestyle, and in any case the kind of CPU I could buy for cheap would be comically underpowered compared to the i7 4850HQ I already had in front of me. So I started looking into the scary world of external Thunderbolt GPUs, colloquially known as eGPU. Modern Thunderbolt 3 (allegedly) supports external GPUs in an official capacity, but older Thunderbolt 2 can get the job done as well, even though it’s unsanctioned by Intel. I’m usually reluctant to pursue these sorts of under-the-radar hobbyist projects, but there was enough prior art to make it worth a shot!
Unlike many gaming enthusiasts, my goal was to optimize for simplicity over power: the fewer hacks and workarounds I had to use, the better. I already knew I’d have to use an external monitor and do my gaming in BootCamp, which was already the case. I knew there would be some performance loss from the limited bandwidth of TB2. I gathered that there may be timing issues and other problems that would require a bevy of software hacks to fix — mostly on the Windows side of things. But I was most concerned about the hardware hacking required to get the thing up and running in the first place.
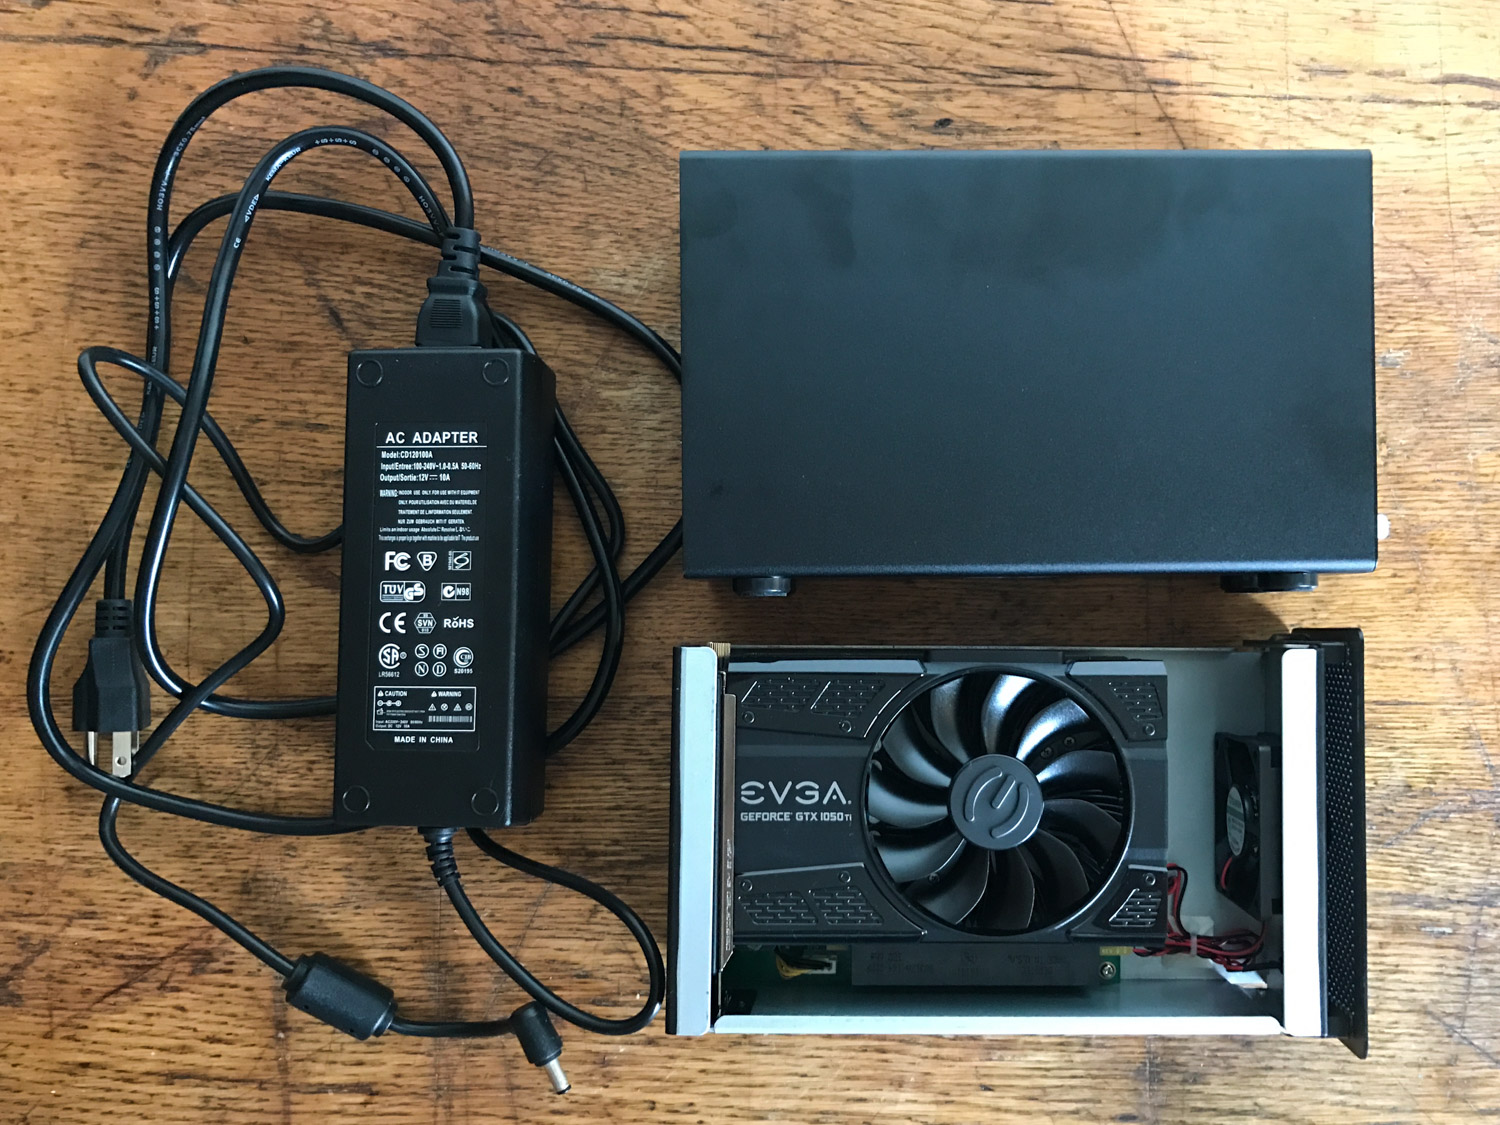
The majority of published eGPU builds involve enormous graphics cards connected to hotwired desktop PSUs, sitting in unseemly, torn-apart Thunderbolt-to-PCI chassises. It was clear that the anointed case for the job was the AKiTiO Thunder2. The Thunder2 wasn’t designed for eGPU use, but dozens of eGPU enthusiasts on forums like TechInferno demonstrated that it ran stable and performed admirably. (AKiTiO engineers even popped in on occasion to offer under-the-table eGPU advice — off-warranty, of course.) It was also one of the cheapest options on the market at around $200: very fair considering that a barebones development Thunderbolt 2 board cost nearly as much!
Most eGPU builders buy this case to hack up, not to use as-is. Usually, the front panel is bent back or removed to fit larger cards, and then a desktop PSU is made to turn on with a paperclip and adapted to fit the DC plug. There are also arcane startup rituals to get everything powered and running with the right timing. I really didn’t want to have a PSU octopus and a ragged hunk of metal sitting bare on my table, though it sadly seemed inevitable. Then I discovered an alternate route.
Most GPUs are power hogs that rely on one or two extra power ports on top of the card, but there are a few designed to pull power straight from the PCI slot. These aren’t super-extreme gaming cards, but these days they more than get the job done. For example, the just-released NVIDIA GeForce GTX 1050 Ti can pull 1080p at medium-high settings in many recent games and currently benchmarks as the ~40th best video card on the market! Better yet, many of these single-slot offerings are short and half as long as the monster enthusiast cards, easily fitting into AKiTiO’s compact case without any modifications. Using this type of card, I’d be able to keep my Thunder2 in one piece and avoid using a PSU entirely. No hacks required!
At peak, these slot-powered cards can draw 75W from the PCI Express slot. Unfortunately, the AKiTiO Thunder2 only comes with a 60W adapter, 30W of which is allocated to the circuitry. A dead-end? Not so fast: as stated in the official docs and verified by employees, the Thunder2 can actually pull as much as 120W from a more powerful adapter. To be compatible, the new power brick needs to sport a 5.5×2.5mm barrel plug, provide 12V output, and have center positive polarity. (Practically every power adapter has these last two items listed on the back.) My hope was to find a laptop power brick with these same specs, but it turned out that most laptops used chargers with an all-too-high output of 20V. Surprisingly, well-reviewed 12V/10A bricks weren’t common at all on Amazon (unless you lived in the UK or Europe), with most of the listings taken up by rebranded versions of a sketchy-looking adapter with model number CT-1250. Eventually, I discovered one vendor who was selling bricks with model number CD120100A, which had a more confident label and looked identical to a power brick I saw in another successful closed-case AKiTiO build. (The Amazon listing was full of typos and the product photos didn’t match the user photos, but it just so happened that the adapter in the user photos was exactly the one I was hoping to find — and Prime allowed for painless returns in any case.) If the US 12V/10A adapter market was really dominated by CT-1250 and CD120100A, the latter just seemed like a better bet.
For the graphics card, I decided to give the EVGA factory-overclocked version of the 1050 Ti a try, since one eGPU enthusiast mentioned that their EVGA card handled boot timing issues a bit better. (True or not, I’ve also had positive experiences with EVGA warranty and support in the past, so it was an easy decision.) Potentially, the overclock was a problem: the AKiTiO Thunder2 wouldn’t provide more than 75W of power to the slot, and any excess power pulled by the card could destabilize the system or even fry the circuitry (as reported by one user). But from everything I read, factory-overclocked EVGA cards were designed to never exceed the 75W threshold, and any instability could simply be fixed by underclocking the card slightly using EVGA’s (or possibly NVIDIA’s) own tools. Factor in the fact that the non-overclocked version cost exactly the same as overclocked while probably having lower resale value, and it became clear that the SC model was almost certainly the better buy — even if you dropped the clocks right from the get-go.
(Note: many reviews will point out that the regular 1050 is a much better deal than the 1050 Ti from a price/performance perspective. Still, the Ti is about 20% faster than the non-Ti for just $20 more, and for the sake of future-proofing as well as TB2 performance loss it just makes sense to wring as much power from the purchase as possible.)
Trawling eGPU forums for installation instructions was quite frustrating. Most users preferred to write about how they got their eGPUs working with their laptop displays (using Optimus drivers — possible with NVIDIA GTX cards) and/or in OSX. Both tasks involved copious scripts and hacks. I was only interested in the bare minimum — BootCamp on an external display — but most guides simply skipped that “easy” part. Would I need to make a custom build of Windows? Edit drivers? Install a custom bootloader? Nothing was clear, so I decided to just jump into it.
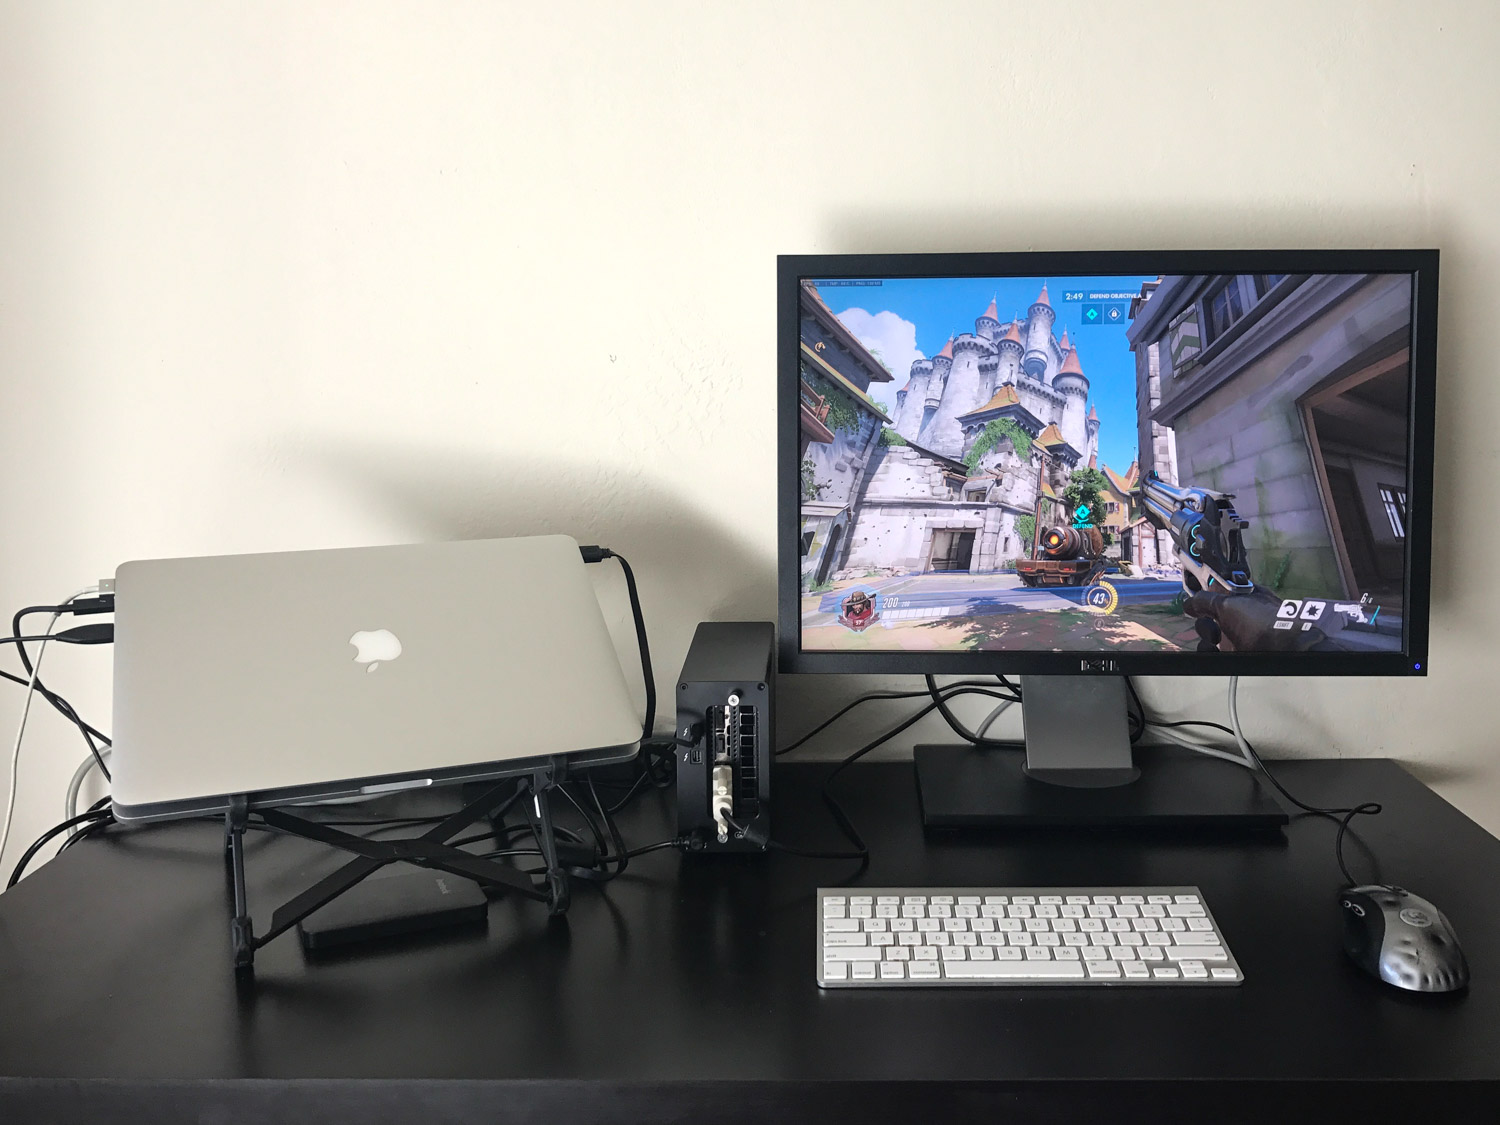
Once I got all the parts assembled, I plugged the Thunder2 into my laptop and my monitor into the Thunder2, crossed my fingers, and turned on the computer while holding down the Alt key (for the boot menu — I already had BootCamp with the latest Windows 10 installed). At first… nothing. Just a black screen and no chime. I tried unplugging the cable, turning the machine on, waiting for the chime, and then plugging it in. The boot menu showed up, but froze when I selected Windows. I tried one more time to boot with the cable plugged in and it worked! Or — at least, it booted into Windows. Nothing showed up on the external display, but the Windows Device Manager had a tempting entry named “Microsoft Basic Display Adapter”. Hopeful, I searched for other eGPU users who had gotten to this step, and it became apparent that all I had to do was install the latest NVIDIA drivers. One reboot later (with no issues this time) and I was seeing “NVIDIA GTX 1050 Ti” in my Device Manager. I gave Overwatch a quick run on the highest settings, but performance didn’t seem particularly great; my suspicion was that the laptop defaulted to the discrete 750M instead of the eGPU. I returned to Device Manager and disabled the 750M, restarted Overwatch, and… 60fps! It actually worked! Holy cow!
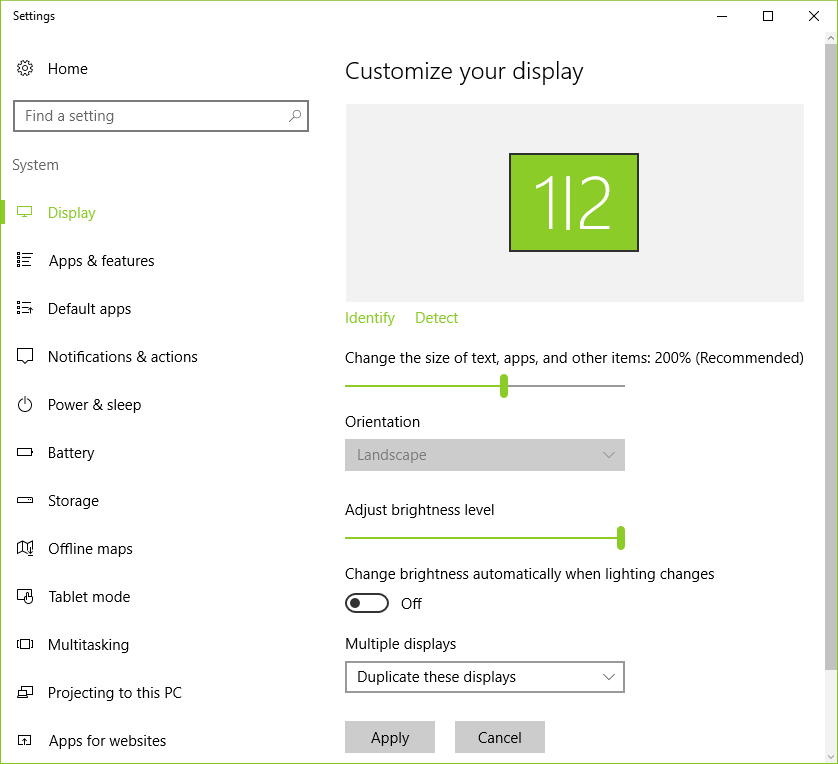
eGPU setup can be daunting depending on your hardware, but I seem to have gotten away with a problem-free configuration. The “hardest” part is getting the computer to chime on boot, presumably indicating that POST went correctly. This involves turning the computer off and on again one or two times in the worst case: if it chimes and the boot menu appears, everything is sure to work fine. (Recently, I’ve been getting the boot menu on first try 100% of the time. Maybe I was just impatient before!) Once booted into Windows, I’ve learned that simply changing the display settings to only use the external monitor, or to extend the desktop and use the external monitor as the main monitor, ensures that the eGPU is used over the discrete chip. (And I believe Windows remembers this preference when you launch with the eGPU connected.)
Now for some benchmarks! The main bottleneck in this setup is the TB2 connection. TB2 doesn’t allow for the full PCIe x16 throughput, potentially crippling graphics card performance. In practice, this isn’t really that big of a deal: users have reported at most a 20% performance loss over native, and usually a bit less. Let’s see how well we do.
| GTX 1050 Ti SC | GT 750M | Improvement | |
|---|---|---|---|
| 3DMark Fire Strike | |||
| Graphics Score | 6993 | 1911 | 3.66× |
| Graphics FPS 1 | 32.28 | 8.74 | 3.69× |
| Graphics FPS 2 | 28.74 | 7.96 | 3.61× |
| 3DMark Time Spy | |||
| Graphics Score | 2040 | 450 | 4.53× |
| Graphics FPS 1 | 13.67 | 3.00 | 4.56× |
| Graphics FPS 2 | 11.43 | 2.54 | 4.50× |
| 3DMark Sky Dive | |||
| Graphics Score | 22564 | 5602 | 4.03× |
| Graphics FPS 1 | 102.25 | 26.41 | 3.87× |
| Graphics FPS 2 | 103.83 | 24.80 | 4.19× |
| 3DMark11 Free | |||
| Graphics Score | 8802 | 2445 | 3.60× |
| Graphics FPS 1 | 42.83 | 11.27 | 3.80× |
| Graphics FPS 2 | 42.18 | 11.40 | 3.70× |
| Graphics FPS 3 | 54.32 | 15.52 | 3.50× |
| Graphics FPS 4 | 25.13 | 7.39 | 3.40× |
Quite an upgrade! According to Passmark and other benchmark listings, a 1050 Ti should, under normal circumstances, be about 4.5× as powerful as a 750M. Factor in 10%-20% performance loss from the TB link and that’s exactly what we see in our results: a 4x boost on average.
Even without any underclocking, stability has not been an issue. I’ve been playing hours of Crysis 3, Far Cry 4, and Mirror’s Edge Catalyst over the past few days and everything’s still working great. I’m keeping the case closed, but I don’t think there’s any real risk of overheating: the GPU fan is designed to funnel heat right out through the back and there’s an extra front fan build into the case anyway. According to 3DMark, temperature during benchmarking has been stable.
I’m not interested in running any weird scripts to get Optimus drivers for the internal display working, but I learned something interesting while fiddling with the Windows display settings. If you set the multiple display setting to “Duplicate these displays”, it seems that somehow the eGPU gets used for both the internal and external display! Assuming I’m interpreting this finding correctly, this means that theoretically you could buy something like this HDMI display emulator and use the eGPU on the internal display without an external monitor and without having to go through the hacky process of getting Optimus up and running. Unfortunately, there’s a performance penalty of about 20%-25% (according to my benchmarks) as well as approximately 0.25 seconds of latency, making this approach untenable for first-person shooters and other twitchy games. (I wonder if this is also the case with the Optimus driver route?)
Another interesting finding: if you keep the discrete GPU enabled, there’s a setting in the NVIDIA control panel to dedicate one of the GPUs to PhysX. I’m not sure if this will make a real difference in performance or cause stability issues, but it might be worth investigating in the future.
To summarize, using only…
- An AKiTiO Thunder2 PCIe Box ($220)
- An EVGA GeForce GTX 1050 Ti SC ($140)
- A 120W 12V/10A power adapter with a 5.5×2.5mm plug and center positive polarity ($35 — though buy it from a seller with Prime in case it’s the wrong one! This listing used to have a Prime seller, but I don’t see them anymore. Also, HN has pointed out that this may be a far better adapter, even if it’s not sold on Amazon.)
…you can assemble a painless, hack-less eGPU build and use it with your late-2013 15” dGPU MacBook as a relatively inexpensive graphics upgrade compared to building a PC from scratch or buying a console. (Cheaper still if you wait for rebates or use an older/weaker X50 card.) Caveat emptor: the same build might not work so well — or at all! — on other MacBook models or even with a different driver version. In other words, what worked for me might not work for you! Remember that eGPU on TB2 is not officially supported and mostly works by accident, though clearly it can work very well.
(Also, there’s some great information in the HN thread for this post about new and upcoming TB3 enclosures. If you can get one working with a TB3-to-TB2 adapter, it might be the best option of all for upgradability, reliability, and future-proofing. On the other hand, you’ll probably spend more money and the case will be a lot bigger. Do your research!)
In time, I hope somebody releases a Thunderbolt 3 eGPU the size of one of those Square credit card readers — maybe sporting a GTX 980M caliber chip? — that plugs into a USB-C port and works seamlessly with the internal display. But for now, this lovely little eGPU will do just fine. I’m confident that my trusty MacBook can now serve me for another few years, especially if NVIDIA continues to release excellent and inexpensive PCI-powered cards on the regular.
Let’s hope that the eGPU revolution is just beginning!
—Archagon
December 31, 2016