
eGPU Redux: Sticking a GTX 1080 in an AKiTiO Thunder2
Jul 25, 2018 technology reviews
It’s been a year and a half since I wrote my article on building a hassle-free Thunderbolt 2 eGPU for my late-2013 15” Macbook Pro. In all this time—with the caveat that I was exclusively using an external monitor through Bootcamp—I’ve had essentially zero issues with the setup. Booting would occasionally require one or two attempts to hear the Mac chime, but once you were in, performance was flawless. The GTX 1050 Ti was quite an excellent little card.
However, my power requirements recently changed. When the Oculus Rift went on sale for $350, I just couldn’t resist picking one up. VR was new to me and I wasn’t sure if this was something that would stick, but my first experience with Beat Saber and The Climb left me in awe. This was, very clearly, a new category of human experience that was being offered for just a few hundred bucks! Unfortunately, latecy was now an issue with some of the higher-caliber games such as Batman: Arkham VR, and 60–90fps was essentially a hard requirement for VR immersion. Together with the fact that many newer titles were starting to see poor performance even at lower settings and resolutions, I decided to explore upgrade options.
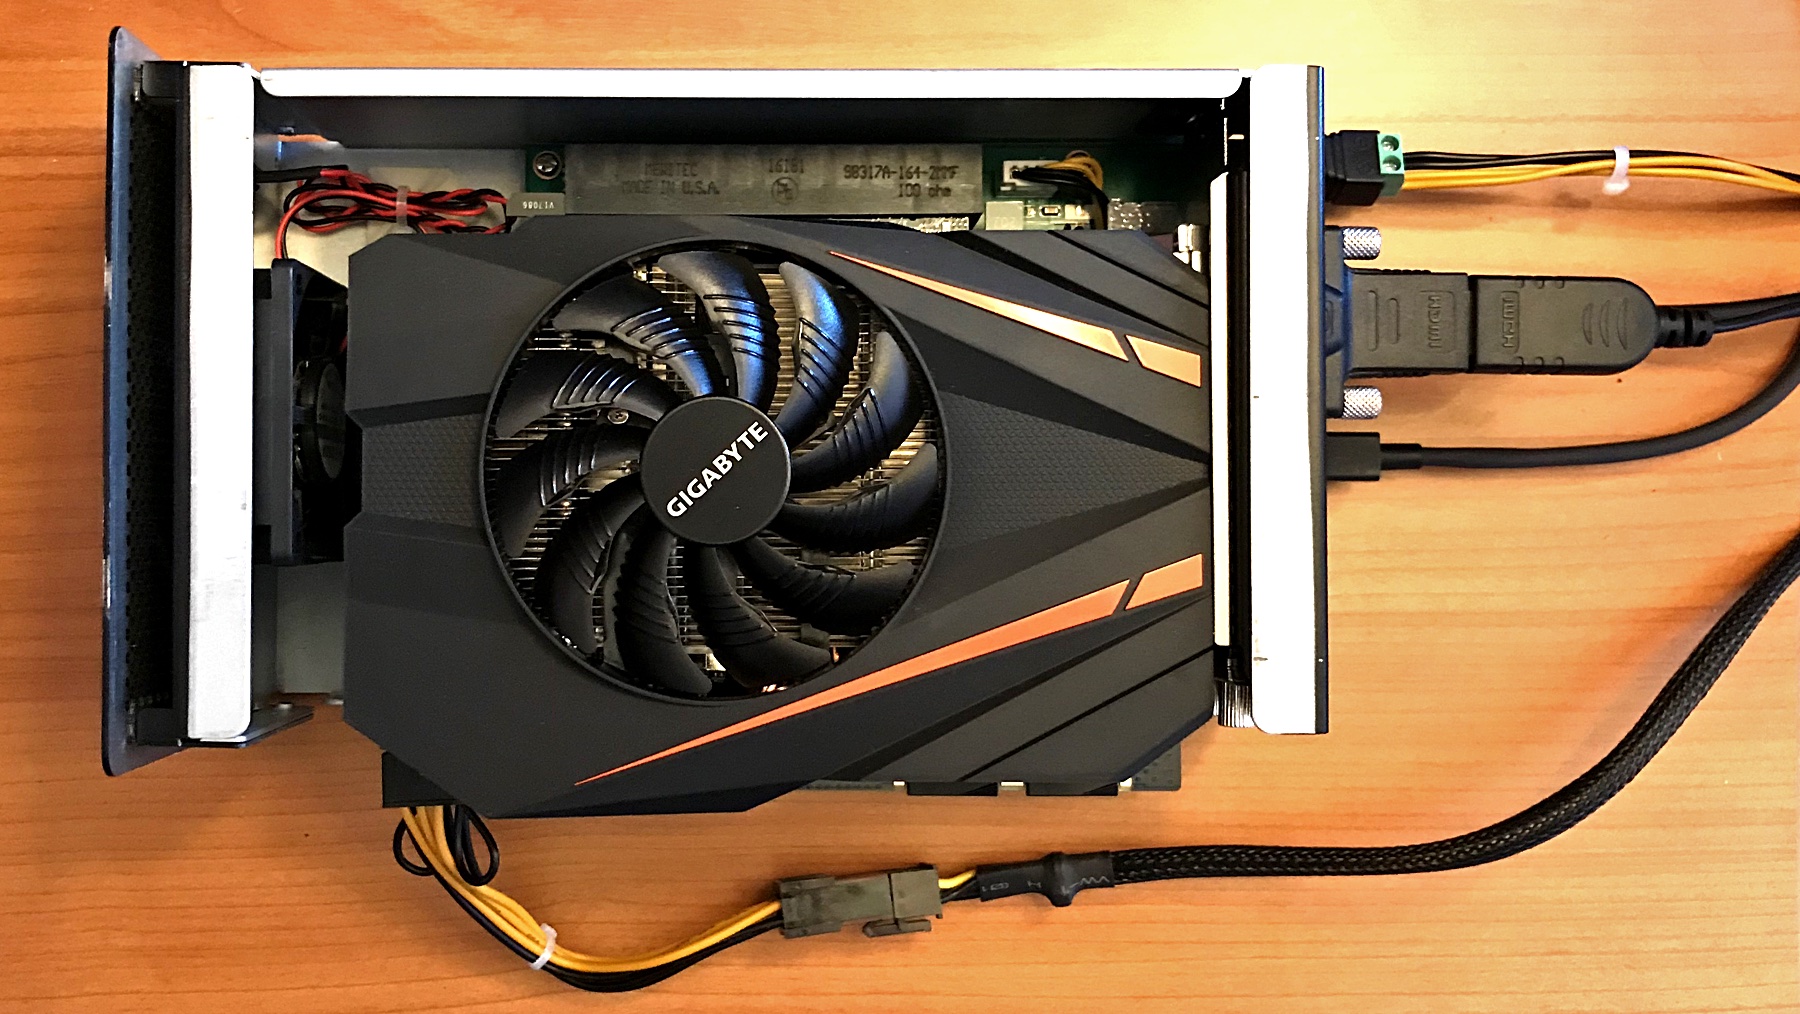
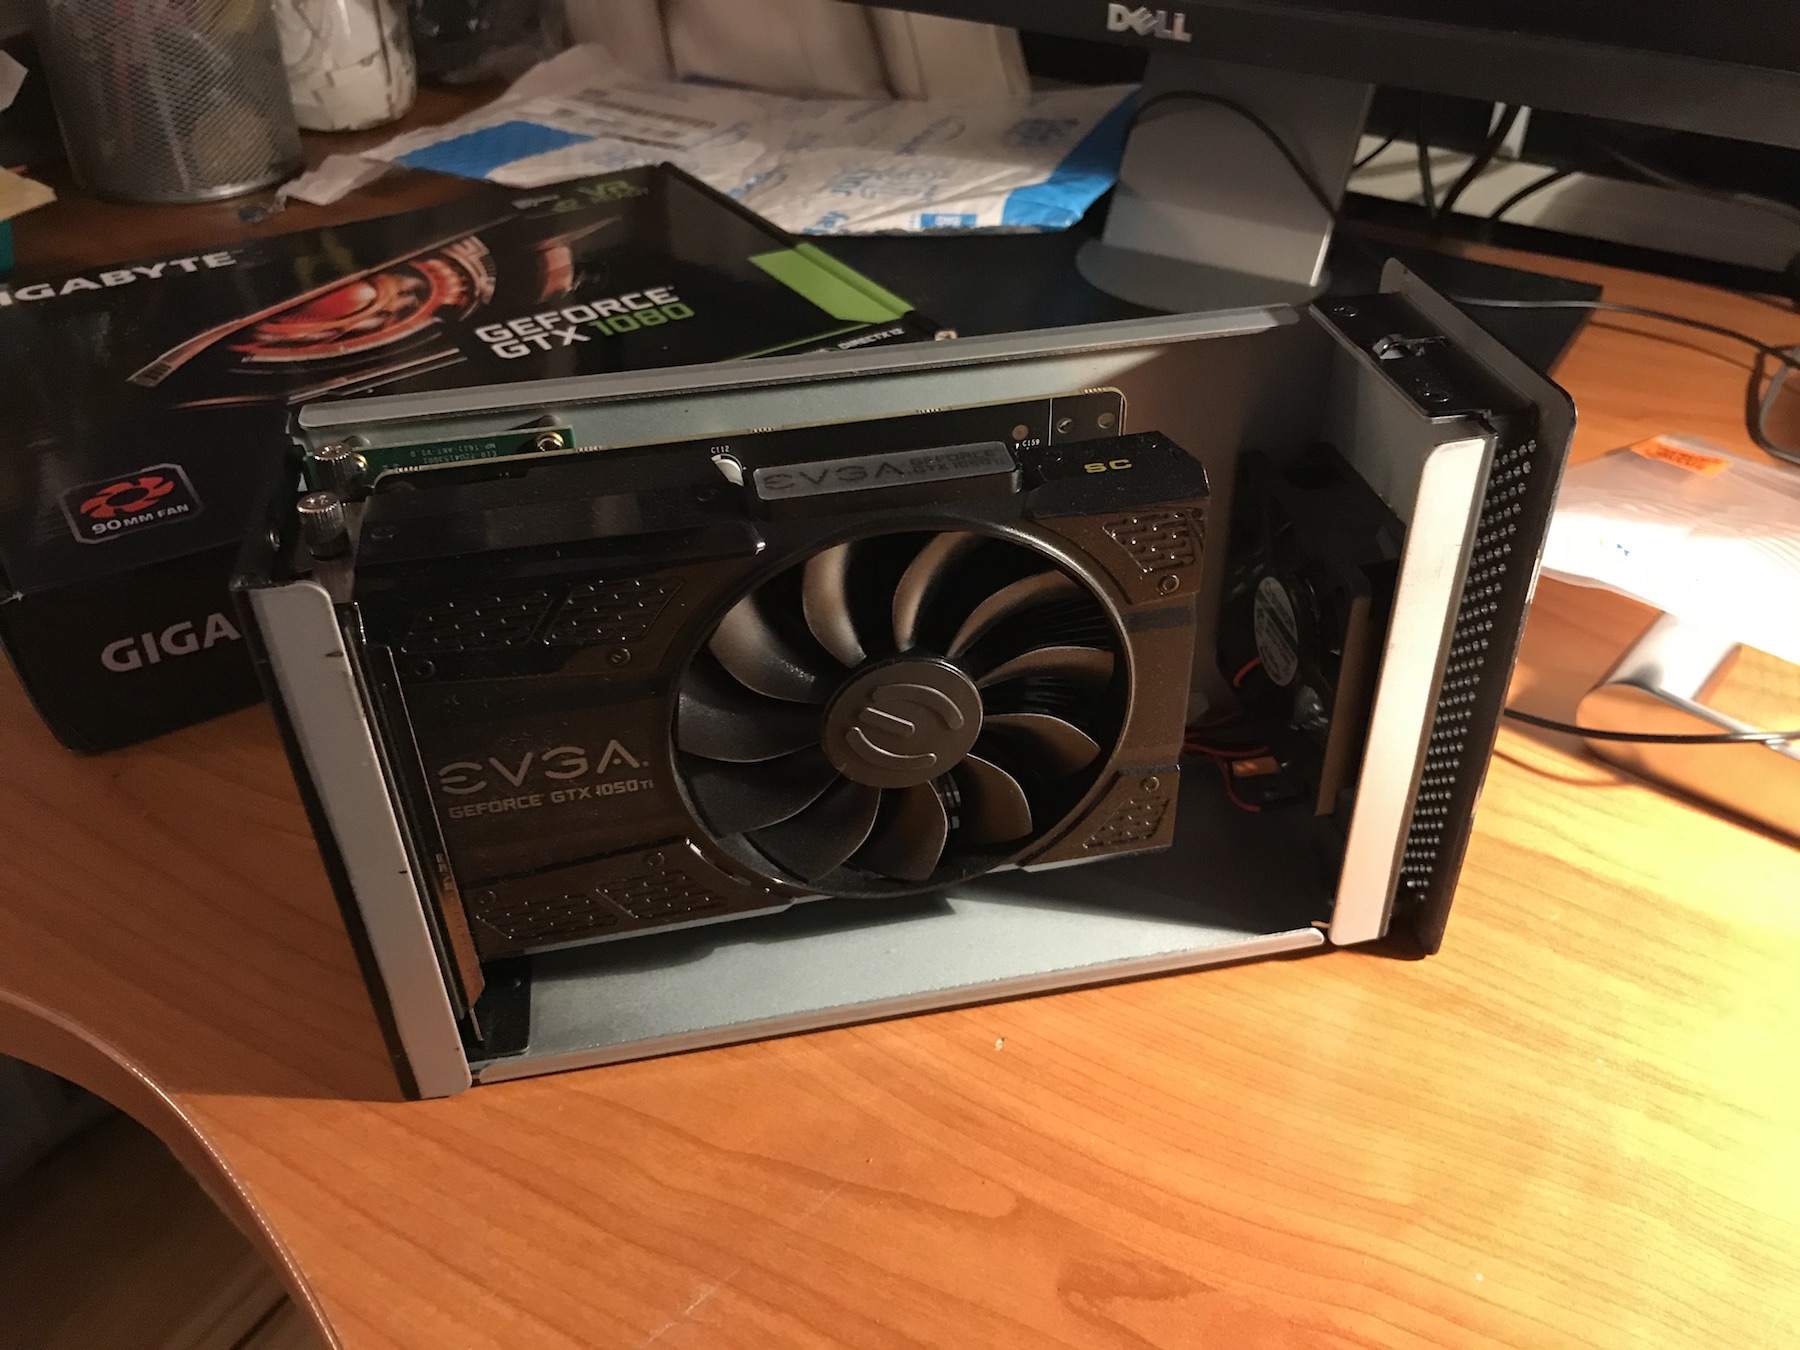
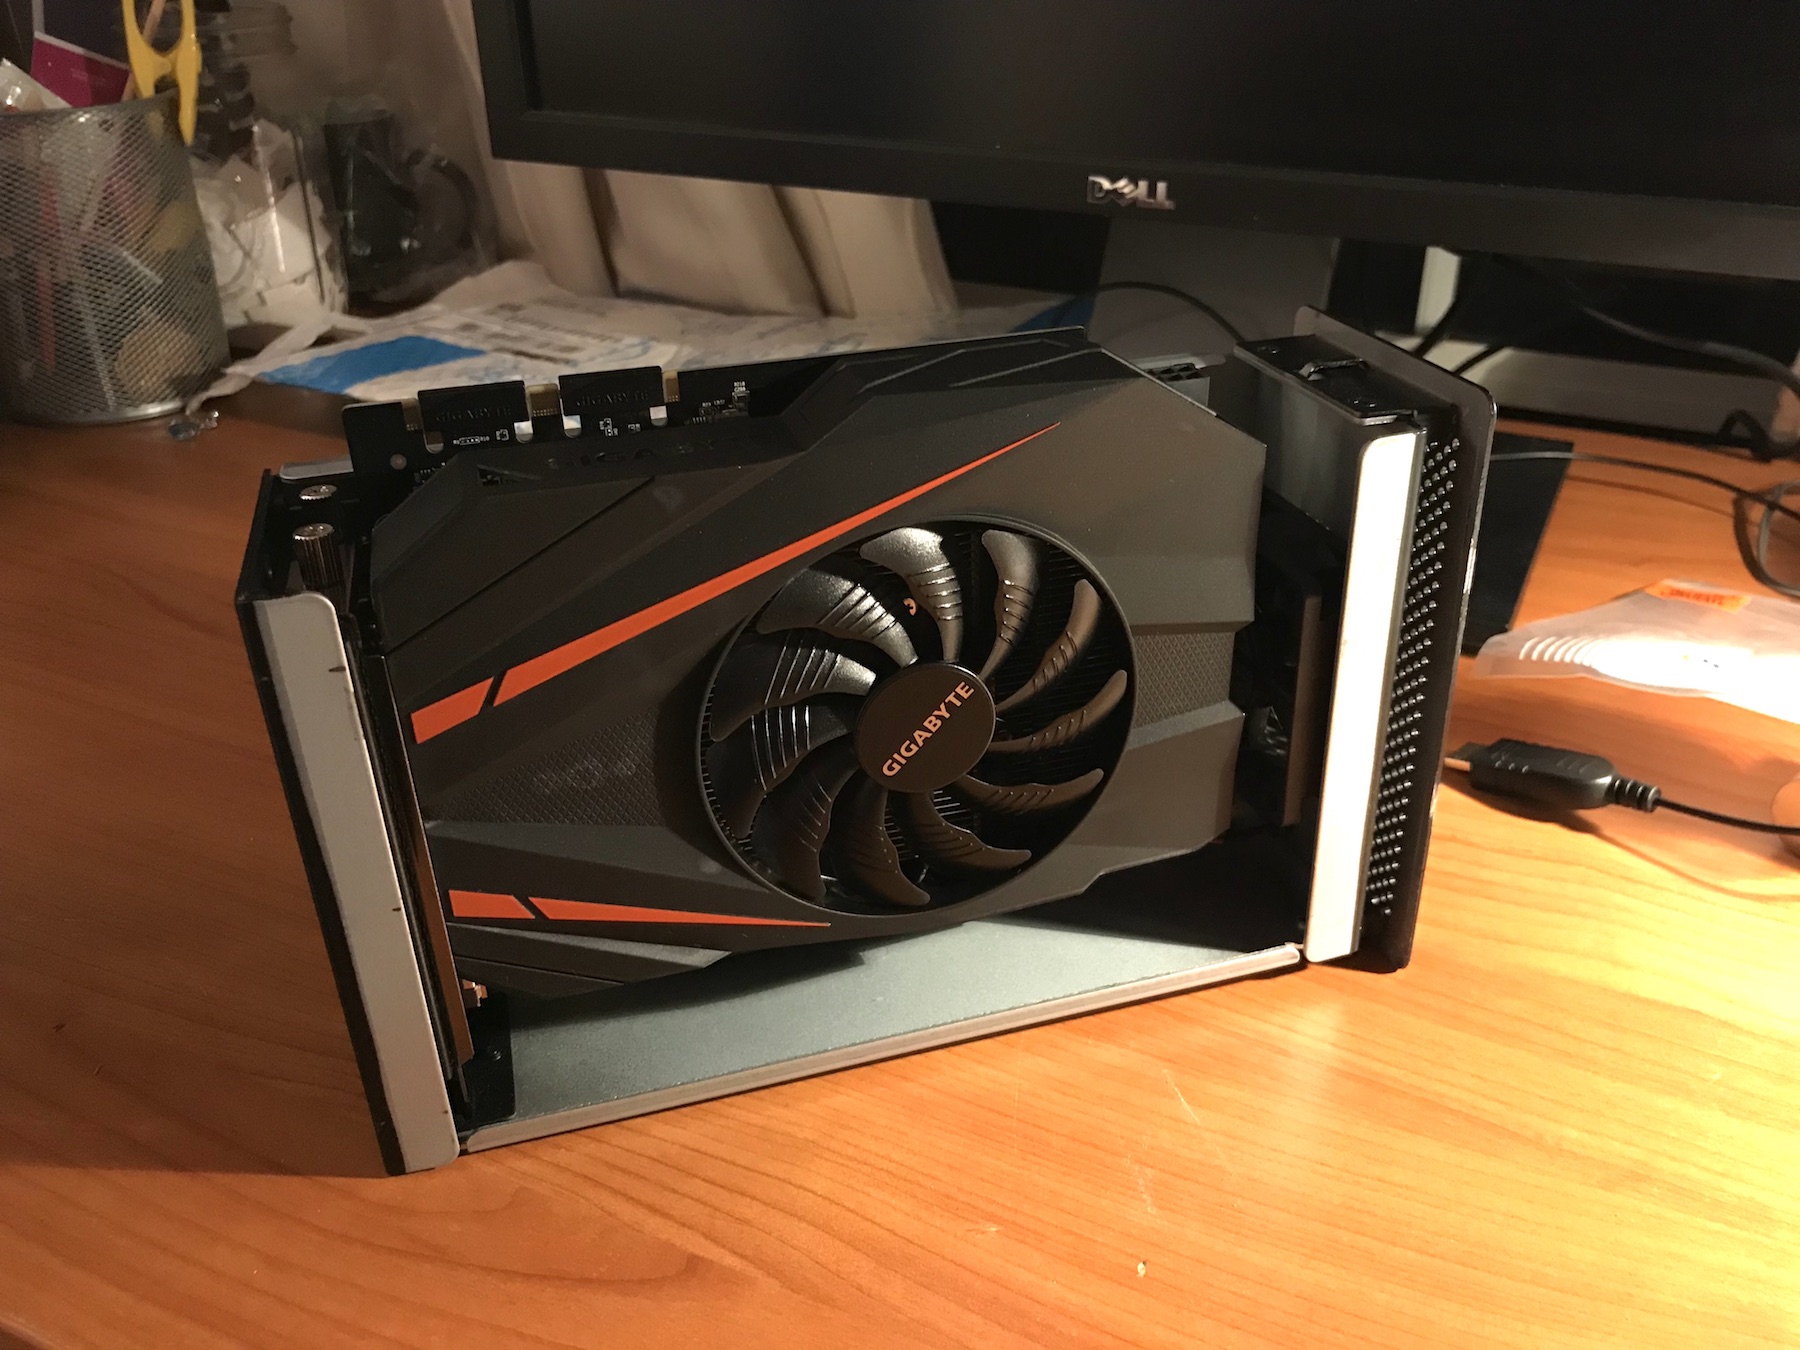
Until recently, I had my eye on the single-fan EVGA GTX 1060 SC to eventually replace my 1050 Ti, since the dimensions were very similar. But in doing this round of research, I was surprised to discover that Gigabyte offered an actual, full-fledged GTX 1080 in almost the same form factor! Though slightly too tall to fit, the card was just the right length for my AKiTiO case, meaning that I could simply take the top off and pop it in without having to do any metal-bending.
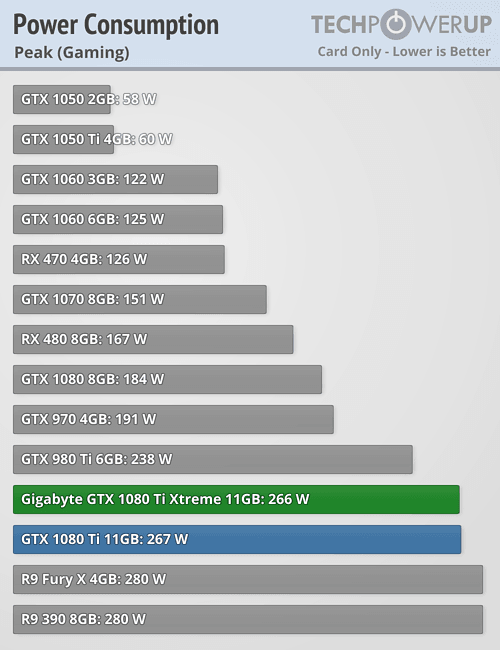
Power-wise, things weren’t as simple this time around. The 1050 Ti, as a 60W card, remained the most powerful GPU that could run entirely on bus power. Meanwhile, the 1080 pulled a full 184W under load! The AKiTiO’s circuitry wasn’t up to the task: the power needed to be supplemented.
Previously, the eGPU community settled on the 220W Dell DA-2 adapter for this task. In effect, this was a portable PSU. All you had to do was add a chain of adapters to the 8-pin connector (bridging two particular pins) and you could power both the enclosure and card at once. (It was important to power both from the same source to avoid electrical issues.) Recently, a new contender in the form of a 242W Mean Well adapter emerged on the scene. This was a better solution since you had a bit more power to work with and the bridge was no longer necessary. However, both adapters were quite beefy, coming in at 197×95×40mm (749cm2) for the DA-2 and 220×95×46mm (961cm2) for the Mean Well. Meanwhile, my current CD120100A adapter was only 165×63×38mm (395cm2), or around half the volume of the newer adapters!
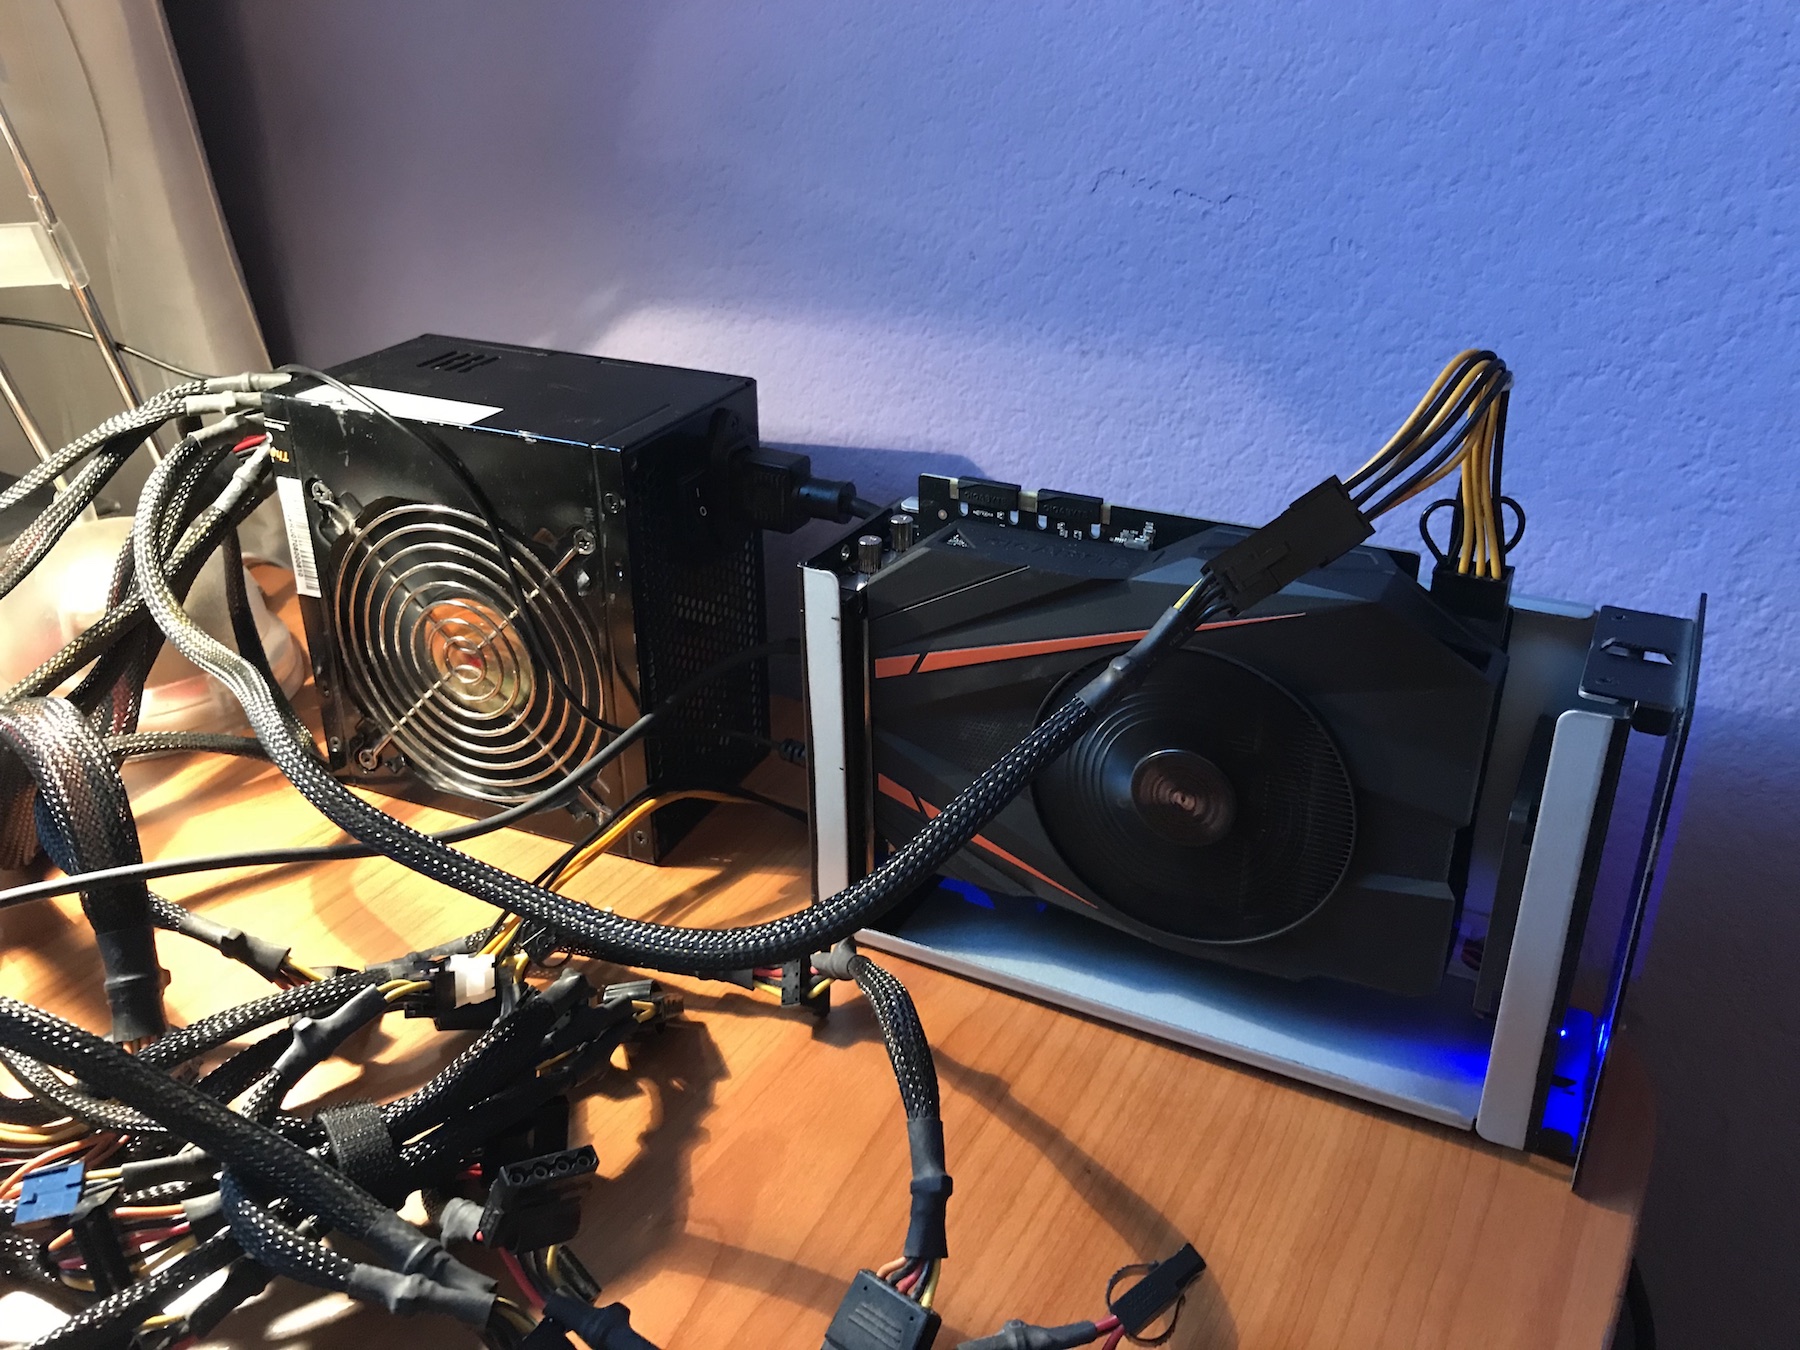
Instead of rushing into any purchases, I decided to go for another well-tested approach for the time being: simply hijack one of my desktop PSUs. Though this required a bit more elbow grease, the process was quite simple on a high level.
First, I needed to add a jumper to the 24-pin ATX connector in order to allow the PSU to turn on without a motherboard. The tired and true way was to bridge the PS_ON pin and a ground pins with a paperclip, but I decided to buy a pre-assembled jumper attachment instead. I was hoping the build quality would be a bit more professional, but it ended up basically being a $5 coated paperclip stuck on a cheap plastic part. Oh well—at least it was easy to take on and off.
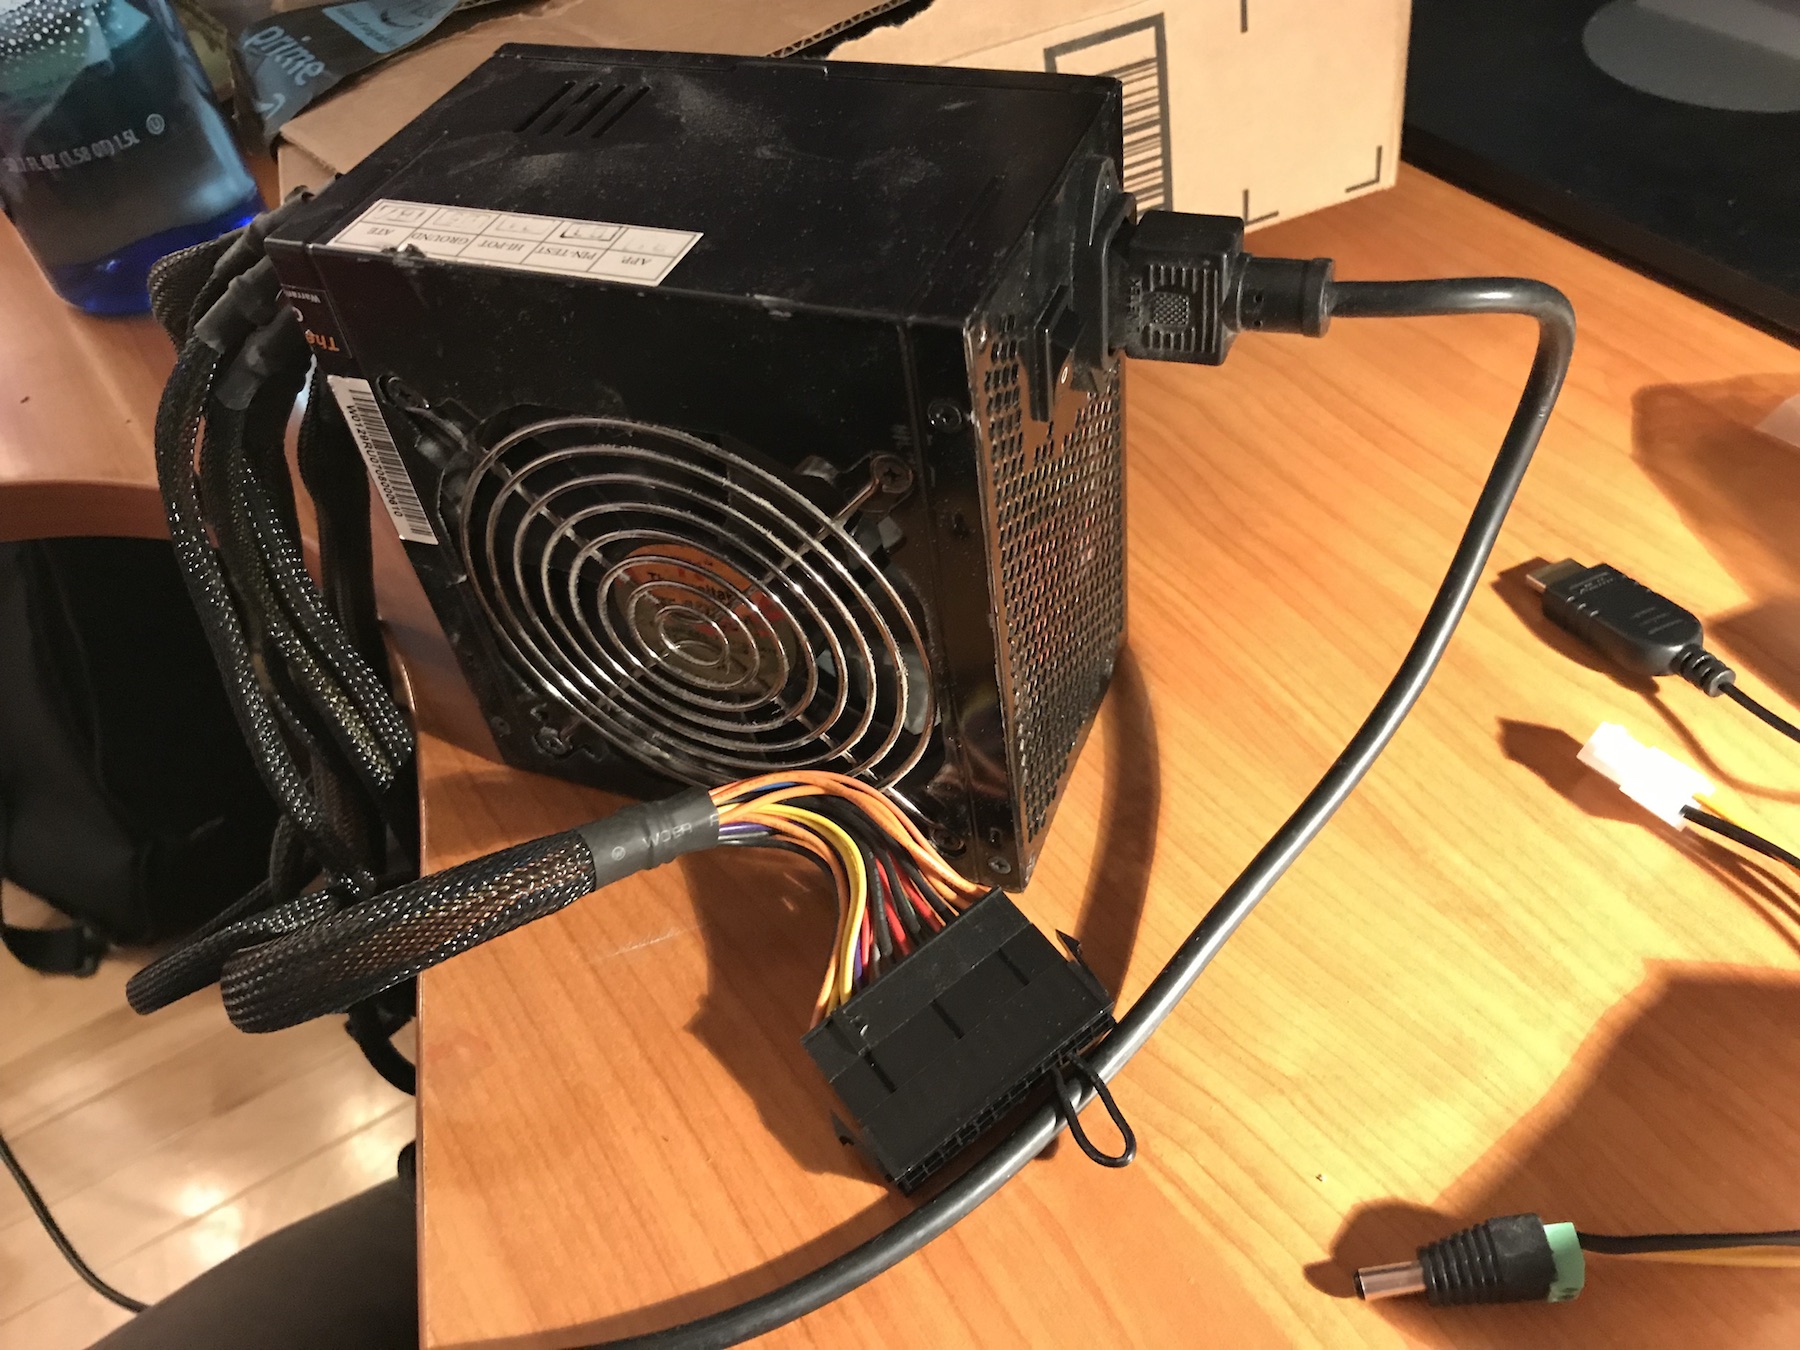
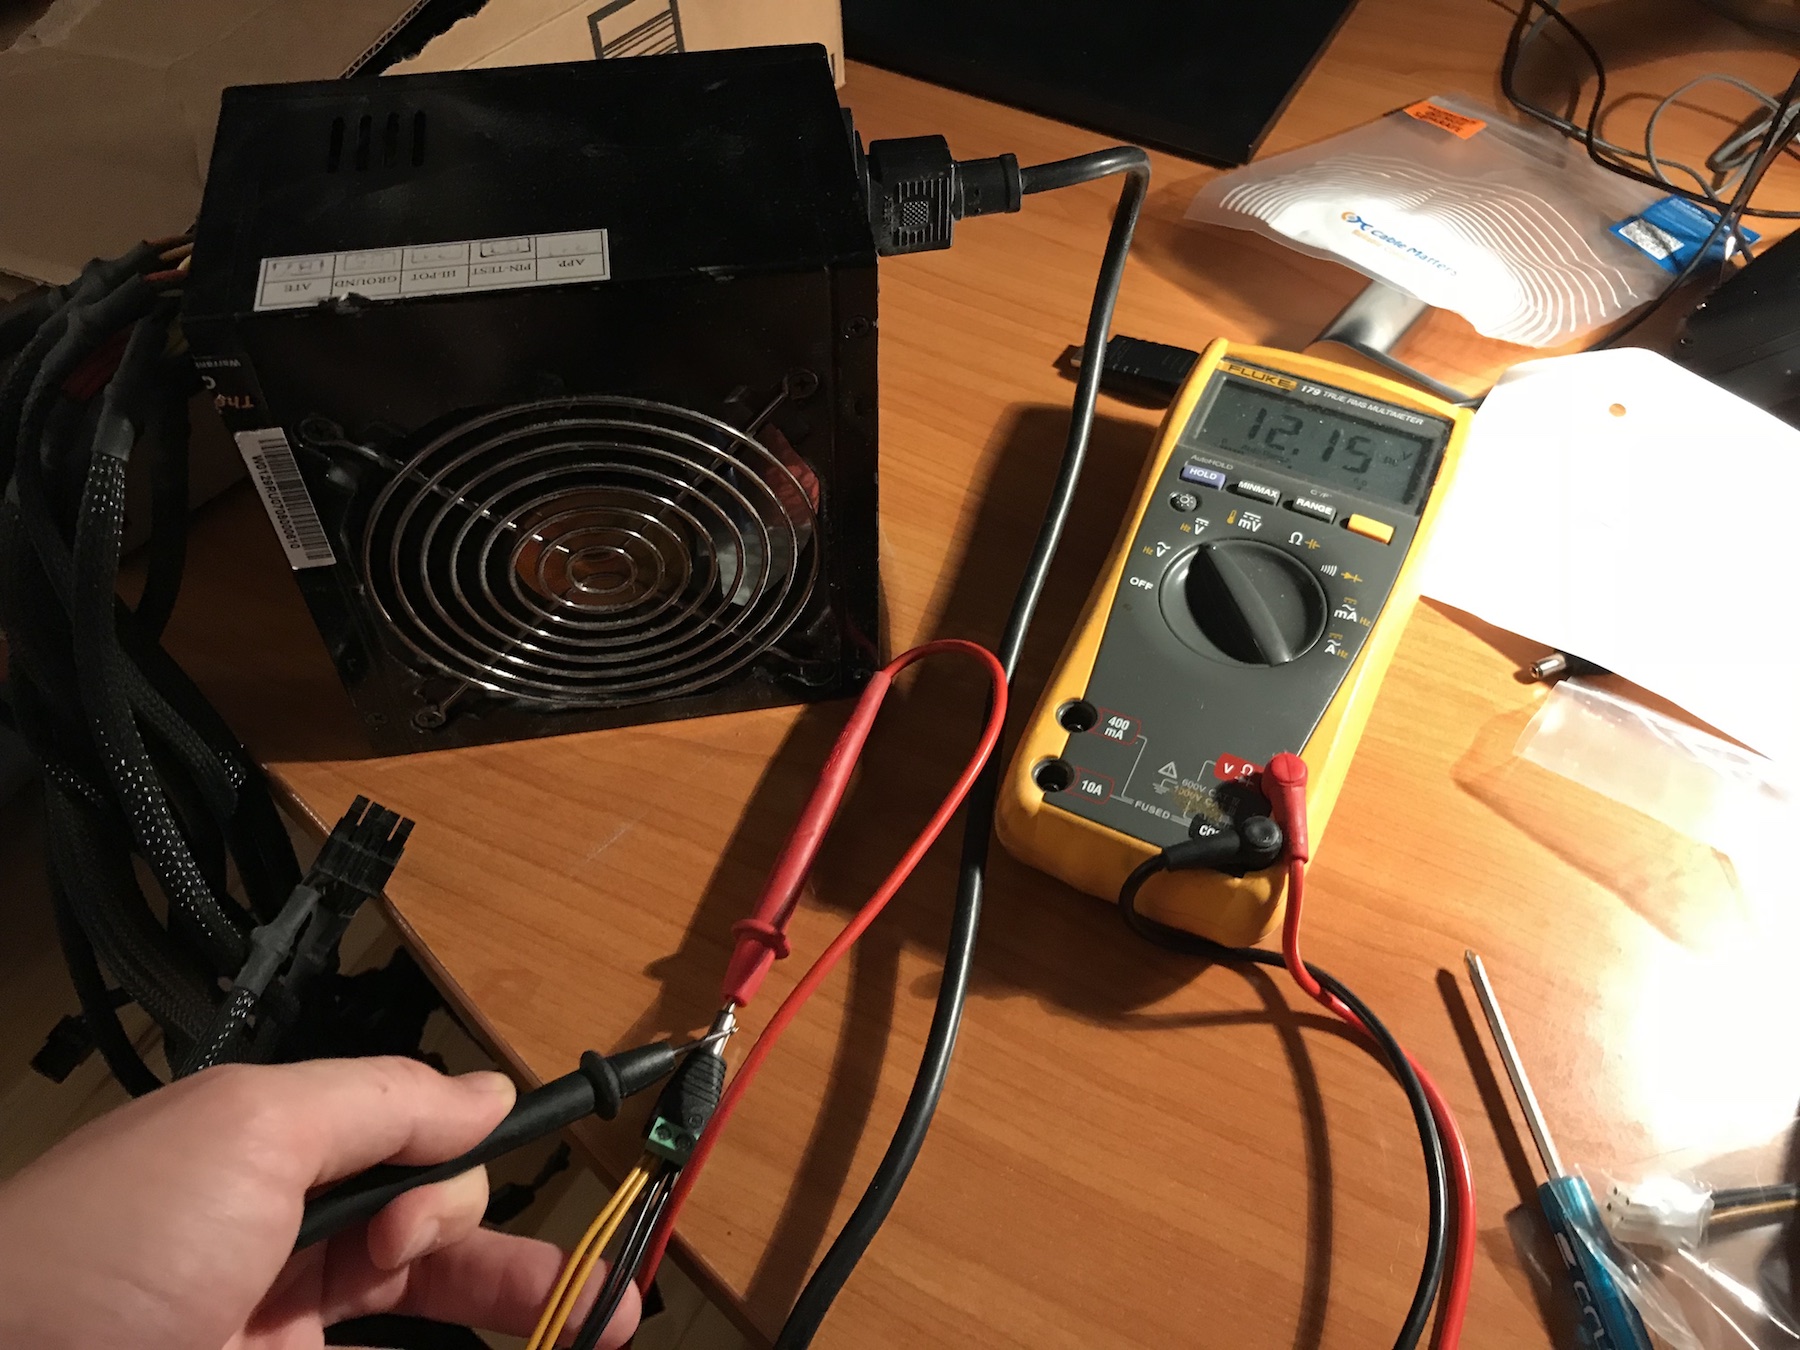
Next, I needed to run a cable from the PSU to the power port on the AKiTiO. Using a 5.5x2.5mm barrel plug to screw terminal connector together with a 4-pin ATX extension cable, the job was quite simple: cut the extension cable in half, strip the wires, and screw them into the connector. This only took a few minutes. I even checked the voltage with a multimeter as described in this video to ensure that the poles weren’t switched.

At this point, it was time to install the new card. Out with the old, in with the new! Of course, I knew ahead of time that the 1080 was too tall for my case. This was fine for the time being, but I figured that in the future, I might attempt to 3D print a brand new top case that was appropriately taller, had some side vents, and featured an outside-facing slot for the 8-pin PCIe connector. (Hopefully, I’ll be able to do it with enough granularity to replicate the attachment grooves in the original.) In the meantime, this setup was better for cooling anyway.
The final step was to connect the 8-pin PCIe connector from the PSU to the card. But, oops! At the last second, I realized my PSU was too old to actually offer this cable. After doing some reading, I discovered (and verified via multimeter) that the 6-pin connectors on most good PSUs provided 12V on all three yellow pins and were therefore 100% eletrically compatible with 8-pin connectors1. I purchased an adapter the next day, finally completing the initial setup.
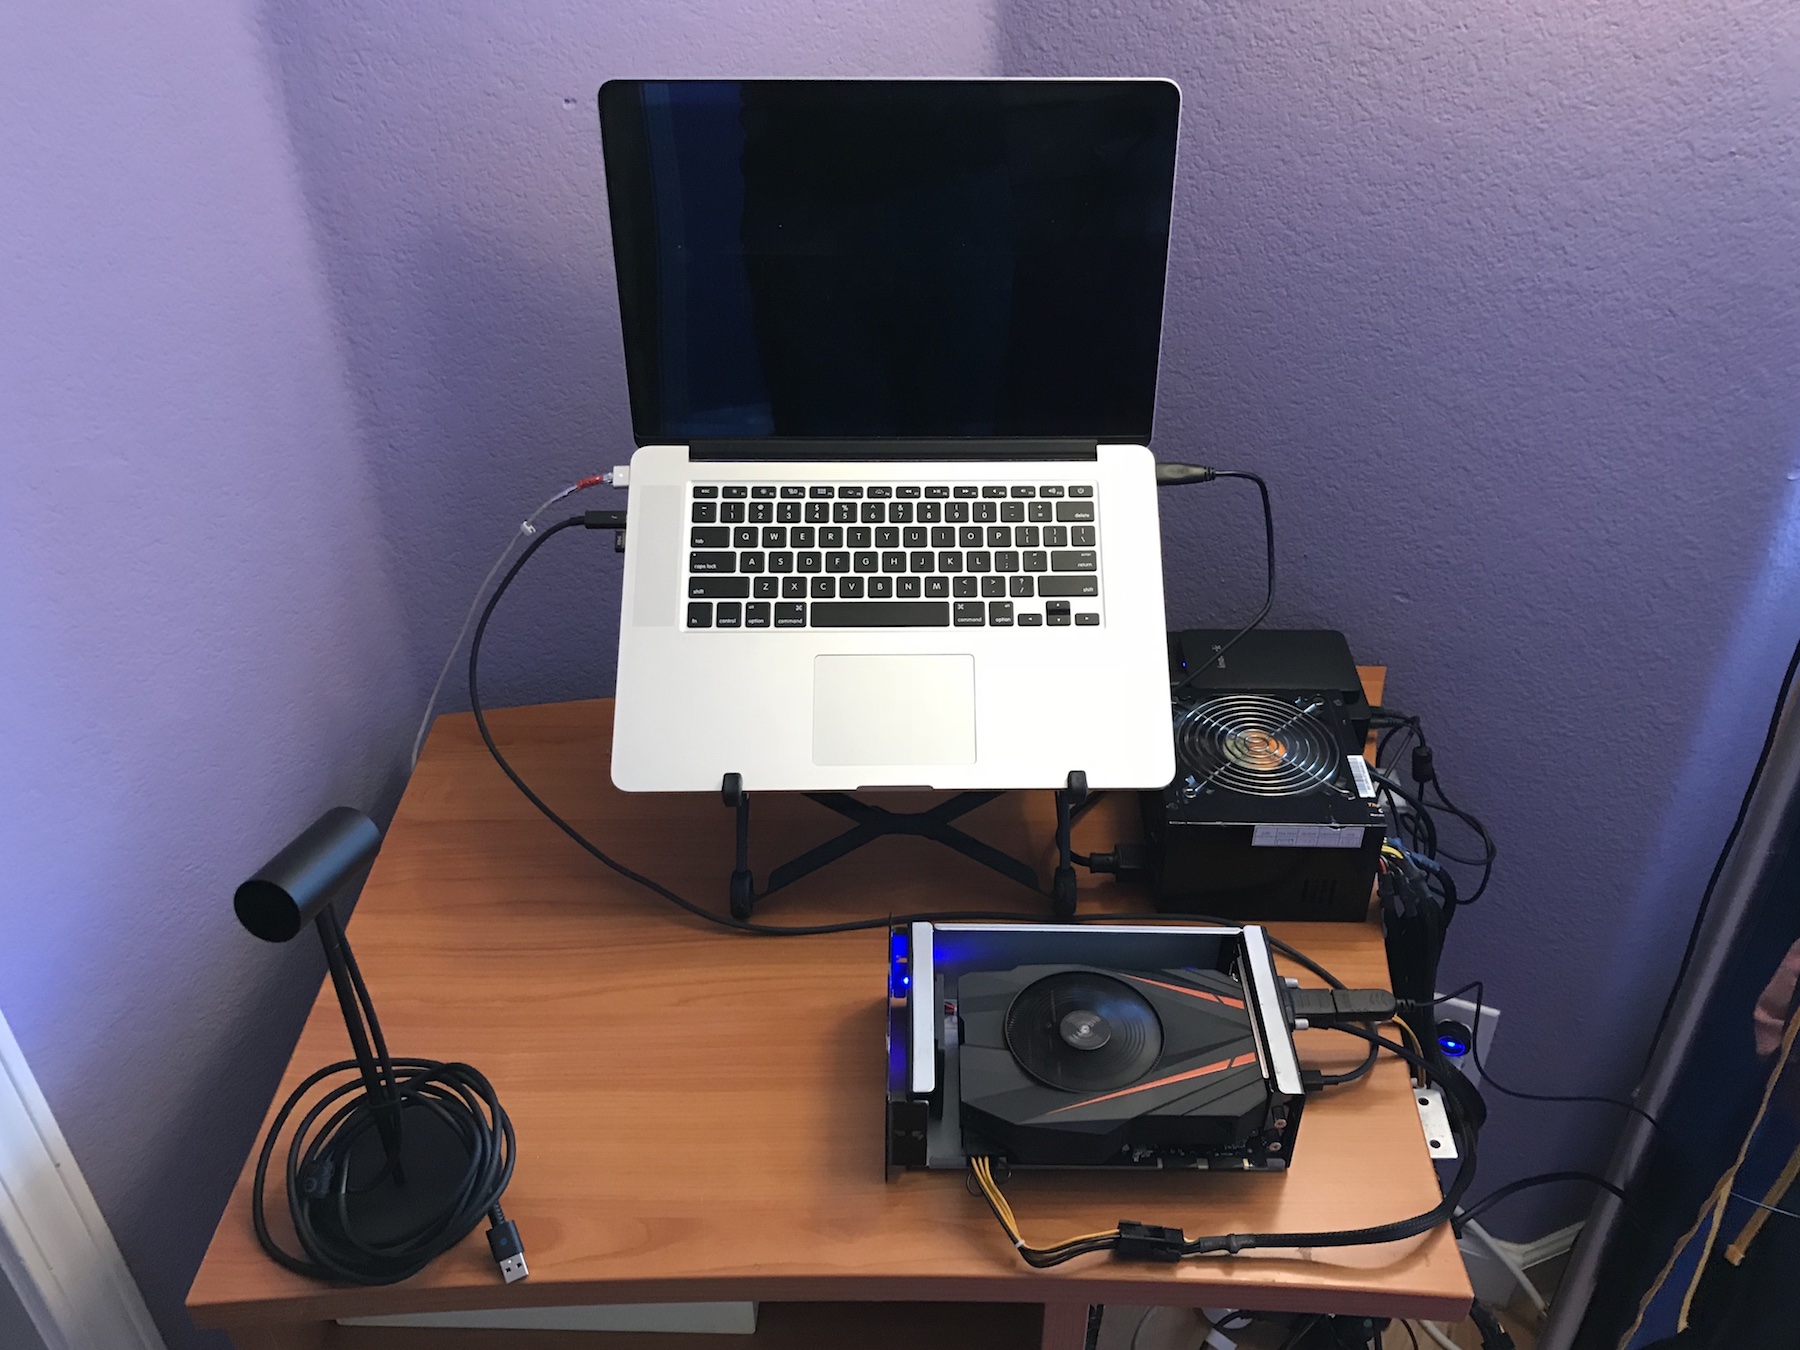
The result of all this hackery was a terrifying sea-slug of a setup. No sane person would look at this contraption and expect it to work. Indeed, it seemed at first that this build would be trouble: I flipped the PSU switch and booted my computer just like before, but the fans in the AKiTiO and card wouldn’t spin up like they were supposed to. Then, I switched the TB2 port on the AKiTiO from top to bottom, and everything started to function exactly as it would with the 1050 Ti. I’d plug in the TB2 cable; turn on my computer; listen for the Mac startup chime; and hold Option to get into Bootcamp. As before, it would sometimes take 2–3 tries to get the thing to chime, but once it did, there were no further hassles.
On first boot, I didn’t get any signal to my external monitor. This is exactly what happened last time, so I went immediately to Device Manager and saw the driverless 1080 as expected. This time, Windows automatically installed the drivers shortly after boot (since I already had them from the 1050) and then promted me to restart. Following this, my monitor lit up and everything started working.
Here are the new benchmarks, with comparisons to the Thunder2’s previous occupant. (Note that I’m only listing the graphics score, not the total score.)
| GTX 1080 | GTX 1050 Ti SC | Improvement | |
|---|---|---|---|
| 3DMark Fire Strike | |||
| Graphics Score | 17109 | 6993 | 2.45× |
| Graphics FPS 1 | 81.86 | 32.28 | 2.54× |
| Graphics FPS 2 | 68.17 | 28.74 | 2.37× |
| 3DMark Time Spy | |||
| Graphics Score | 6343 | 2040 | 3.10× |
| Graphics FPS 1 | 41.61 | 13.67 | 3.04× |
| Graphics FPS 2 | 36.17 | 11.43 | 3.16× |
| 3DMark Sky Dive | |||
| Graphics Score | 55760 | 22564 | 2.47× |
| Graphics FPS 1 | 233.78 | 102.25 | 2.29× |
| Graphics FPS 2 | 279.52 | 103.83 | 2.69× |
| 3DMark11 Free | |||
| Graphics Score | 21363 | 8802 | 2.43× |
| Graphics FPS 1 | 104.98 | 42.83 | 2.45× |
| Graphics FPS 2 | 116.34 | 42.18 | 2.76× |
| Graphics FPS 3 | 131.99 | 54.32 | 2.43× |
| Graphics FPS 4 | 57.58 | 25.13 | 2.29× |
Outside benchmarks pointed to an expected 2.5–3.0× improvement over the 1050 Ti, and my own benchmarks bear this out. (Thus making this system an order of magnitude faster than using the integrated dGPU!) And compared to review benchmarks for the same card, there’s an approximate 20% TB2 performance penalty, just like last time.
More practically, games are running a whole lot faster. I could barely play Far Cry 4 and PUBG on low settings with the 1050, and now I’m running on Ultra at a fairly steady 60fps. As for VR, there’s no longer any lag or jittering in games like The Climb or Batman: Arkham VR—though I’ll still need to buy contact lenses to witness the full improvement. (Despite the fact that everything is blurry, VR is way more immersive without glasses, and you don’t run the risk of scratching the hard-to-replace headset lenses.)
To summarize, these were the new parts I required:
- Gigabyte GeForce GTX 1080 Mini ITX ($530)
- 5.5x2.5mm barrel plug to screw terminal connector ($8)
- 24-pin ATX jumper ($6) (but you could just as easily do it yourself)
- 4-pin ATX extension cable ($8)
- 6-pin to 8-pin PCIe adapter ($7) (but you won’t need this if you have a relatively recent PSU)
And finally, as a more permanent solution to power, I’ve been considering getting a Seasonic Flex SUG 300W PSU ($65), since this is pretty much the smallest available PSU form factor and comes in at a mere 170×81.5×40.5mm (561cm2), or 1.4× the volume of my previous adapter and 0.75× the volume of the Mean Well. It’s also (hackably) modular. But I need to do a bit more research first.
Admittedly, this is a ton of money to spend on hardware. You’re also paying a premium (and perhaps a small performance penalty) for the form factor. However, I think I’m able to justify this purchase. First, VR requires beefy hardware, and though my 1050 Ti gets the job done to an extent, it’s clear that some games can barely chug along. Especially for VR development (which I’m very keen on exploring), this level of hardware is almost mandatory. Second, the 1080 is one of the most powerful cards on the market. I’ll certainly need it to play upcoming power-hungry titles like Cyberpunk 2077 and Metro Exodus. It’ll be sure to last at least a couple of years. I might even get a small performance boost if I upgrade to a TB3 laptop at some point in the future! And third, the 1050 Ti not only hasn’t deprecated in the year and a half that I’ve owned it, but actually increased in MSRP from the $150 I bought it for to nearly $180! This means that the resale value is very close to the original selling price. It’s probably a sound financial idea to sell this card before the 1150/2050 upgrade comes along within the next few months.
Just like last time, I’m publishing this with the caveat that this setup might not work for you, since none of it is officially supported—especially over TB2. Fortunately for me, it seems that the late-2013 15” dGPU Macbook Pro is very well-behaved in this regard: I didn’t have to use apple_set_os.efi, set restore points, solve “error 12”, or perform any of the incantations listed in this handy Bootcamp guide—with the qualifier that I’m perfectly content running everything in Windows over an external monitor. But you might have to do some hacking if, for example, you have a newer Mac with TB3, or if your Mac doesn’t come with a dGPU, or if your dGPU is AMD and not NVIDIA. (These are inferences from what I’ve been reading, not statements of fact.)
So why not just build a gaming PC instead of dealing with this mess? For people living minimalist or travel-heavy lives, modern laptops are good at pretty much everything, but lack the GPU performance required for modern gaming or compute. eGPUs solve this problem in an elegant way, and the Thunder2 1080 remains small enough that you could keep it on your desk or chuck it into a suitcase without much inconvenience. (With the caveat that it needs a new top case and a smaller PSU.) In my opinion, this is the clear future of performance computing for the vast majority of users, and it feels nice to be on that vanguard!
Finally, I should note that the Gigabyte Aorus GTX 1080 Gaming Box appears to use the same hardware and runs over TB3. It’s also quite small, coming in at 1.25× the size of the base Thunder2 and Thunder3 without requiring a hefty power brick. One Amazon review suggests that Apple’s TB3 to TB2 adapter makes it work with older Macs, but other comments indicate that my particular model of Mac would not support this configuration. Not sure if the card is replaceable in this particular model: I’ve heard it both ways, and it looks like custom hardware compared to the basic card in the 1070 Gaming Box. (So probably less resale value for just the card.) Nonetheless, this box might be an excellent option to investigate if you’re starting from scratch with a newer laptop.
You can find a discussion of this article on ![]() .
.
Update 2018-7-28
One possible alternative to the 1080 for this level of performance is the PowerColor RX VEGA 56 NANO Edition, which was apparently released last month but isn’t for sale anywhere at the moment. (It might have to do with the fact that the 56 has a higher hashrate for crypto mining.)
Pros:
- The card would likely fit in the Thunder2 and Thunder3 cases without any mods. (Though the rear fan may have to go.)
- The card would cost 15% less than the Gigabyte 1080.
- Apple seems to currently only support AMD cards for their native High Sierra eGPU functionality. This means that the card would likely work without hacks in macOS on TB3 Macbooks.
- The card would likely work over a TB3 to TB2 adapter on Macbooks with Nvidia dGPUs.
Cons:
- Benchmarks indicate that the 56 is 70–90% as fast as the 1080, and is really more of a competitor to the 1070.
- The power consumption may be as high as 1.5× the 1080’s. The card also requires two 8-pin PCIe connectors.
- It seems that higher end AMD cards are more likely to trigger the nefarious “error 12” in Windows than Nvidia cards. (Fixing this requires manually disabling devices in Device Manager.)
Although compelling in terms of size and cost, I’m very concerned about the heat and power usage of this card. Whereas the 1080 is firmly capped at 180W by design, the 56 appears to have much looser power requirements. Together with the second 8-pin PCIe connector, this means that a Flex ATX PSU may no longer be an option for powering this thing, and that the AKiTiO cases may be too small for safe thermal operation.
-
The linked reference page offers some caveats about wattage, but most people seem to not run into this problem. ↩︎
—Archagon
July 25, 2018