
Path Rendering in Composer's Sketchpad
Feb 27, 2016 programming
This blog post is part of a series on the development of Composer's Sketchpad, a new iPad app for making musical rough drafts and doodles.
Before starting any work on Composer’s Sketchpad, I had to ask myself: was the app as I envisioned it even possible to make? My initial goals were as follows:
- Have an (effectively) infinite canvas with a large number of notes visible at once.
- Allow the canvas to zoom and pan with without any lag.
- Allow the canvas to zoom without the notes losing any sharpness.
- Have notes belonging to the current layer blur or fade when the layer switches.
- Allow the notes to stretch and skew when the grid scale changes without distorting their appearance. (I ended up dropping this for the release version.)
- Have the whole thing run at 60fps on my iPad 3.
I had barely done any graphics programming up to this point, so I had to feel out the limits of OpenGL as I blindly barged ahead — always a painful way to develop a project.
At first, I briefly considered implementing drawing using Photoshop-like brushes: that is to say, directly toggling pixels on a bitmap as the user moved their fingers around the screen. This seemed appropriate for something that behaved so much like a drawing application. However, I quickly realized that the representation of my notes should really be separate from their rendering (as with any good MVC design), which meant that I couldn’t just save the bitmap and be done with it. Furthermore, the finite resolution of the bitmap presented a number of problems. How could I implement high-quality zoom without having to re-render everything? How would it be possible to have an infinite canvas without having to implement a complex tiled rendering system? (I was aiming for maximum possible simplicity in my architecture at this point.) How could I switch layers seamlessly without storing a bitmap for each layer? It just wasn’t a good fit given the dynamic features of my app.
So I decided try for a path rendering approach instead. My musical notes would be stored as points in time/pitch space, and then the renderer would convert them into pleasing, smooth curves to draw on the screen.
There were two obvious techniques that came to mind. The first was to use the CoreGraphics path renderer in the form of UIBezierCurve. This approach was compelling because CoreGraphics’ path drawing support was very robust, to the point of being the foundation of heavyweight applications like Pixelmator. Strokes, fills, and complex shapes were incredibly simple to define and draw, and it was all built-in and battle-tested by thousands of developers.
The second approach that I immediately considered was to convert each curve into polygons and draw them using the GPU. My experience with hardware-accelerated vector graphics, though minor, was very positive: performance seemed smooth and stutterless compared to software rendering in the apps that used it, and the artifacts that occurred while waiting for data to load (jagged lines turning into smooth lines) felt a lot more pleasing than those in software renderers (blurry lines turning into crisp lines). Intuitively, even though I didn’t know any of the details at this point, the idea of manipulating groups of polygons on the GPU rather than plotting out curves pixel-by-pixel seemed like a very efficient approach. In addition, I knew that with polygons, scales and other translations would be effectively free.
Unfortunately, there weren’t any built-in iOS frameworks that allowed me to do this. (Or — so I thought. I later learned that SceneKit had support for path rendering, but it turned out to be fairly ugly, slow, and not particularly configurable.) I didn’t really feel up to the task of rolling my own solution, so I decided to hunt around for a framework. With high high-DPI displays ruling the roost and minimalist UIs being all the rage, surely somebody had a stable framework for hardware-accelerated path rendering on iOS?
During my search, I learned of OpenVG, the Khronos Group’s standard for hardware-accelerated path rendering. It seemed to be exactly what I was looking for! Unfortunately, the standard appeared to be all but abandoned1, with Nvidia’s NV_path_rendering being the only other standard trying to take up the mantle. (Naturally, this was not an extension that iOS OpenGL ES supported.) However, I did manage to find an OpenGL ES framework called MonkVG that incorporated a subset of OpenVG suitable for my project. Looking at the terrifying, twisted, OpenGL-ES-2-wrapping-OpenGL-ES-1-code, I feared that I might have great difficulty using the framework on iOS. Fortunately, it turned out that MonkVG only handled shaders and polygon drawing, not setting up the context or any other platform-specific technical details. After creating my GL UIView and fixing a couple of minor errors, I was good to go.
(Quick aside: over the course of my research, I learned that there were several ways to hardware-accelerate path rendering. MonkVG’s tessellation approach worked fairly efficiently, but it was also imprecise on account of the fact that you ended up with polygon strips in the end. It also required the actual tessellation step to be done on the CPU. In contrast, there are newer approaches that can render the paths directly using shaders. These tend to have high accuracy and detail, and they only require a single bounding-box polygon for the entire shape. Unfortunately, in my limited testing, I found the performance of this approach to be lacking on my iPad 3. Additionally, as I further discuss below, the polygon strip approach turned out to be ideal in the case where shapes needed to be generated once and then cached for future reuse and transformation. From what I can tell, it’s far more difficult to cache rendered curves using the shader approach.)
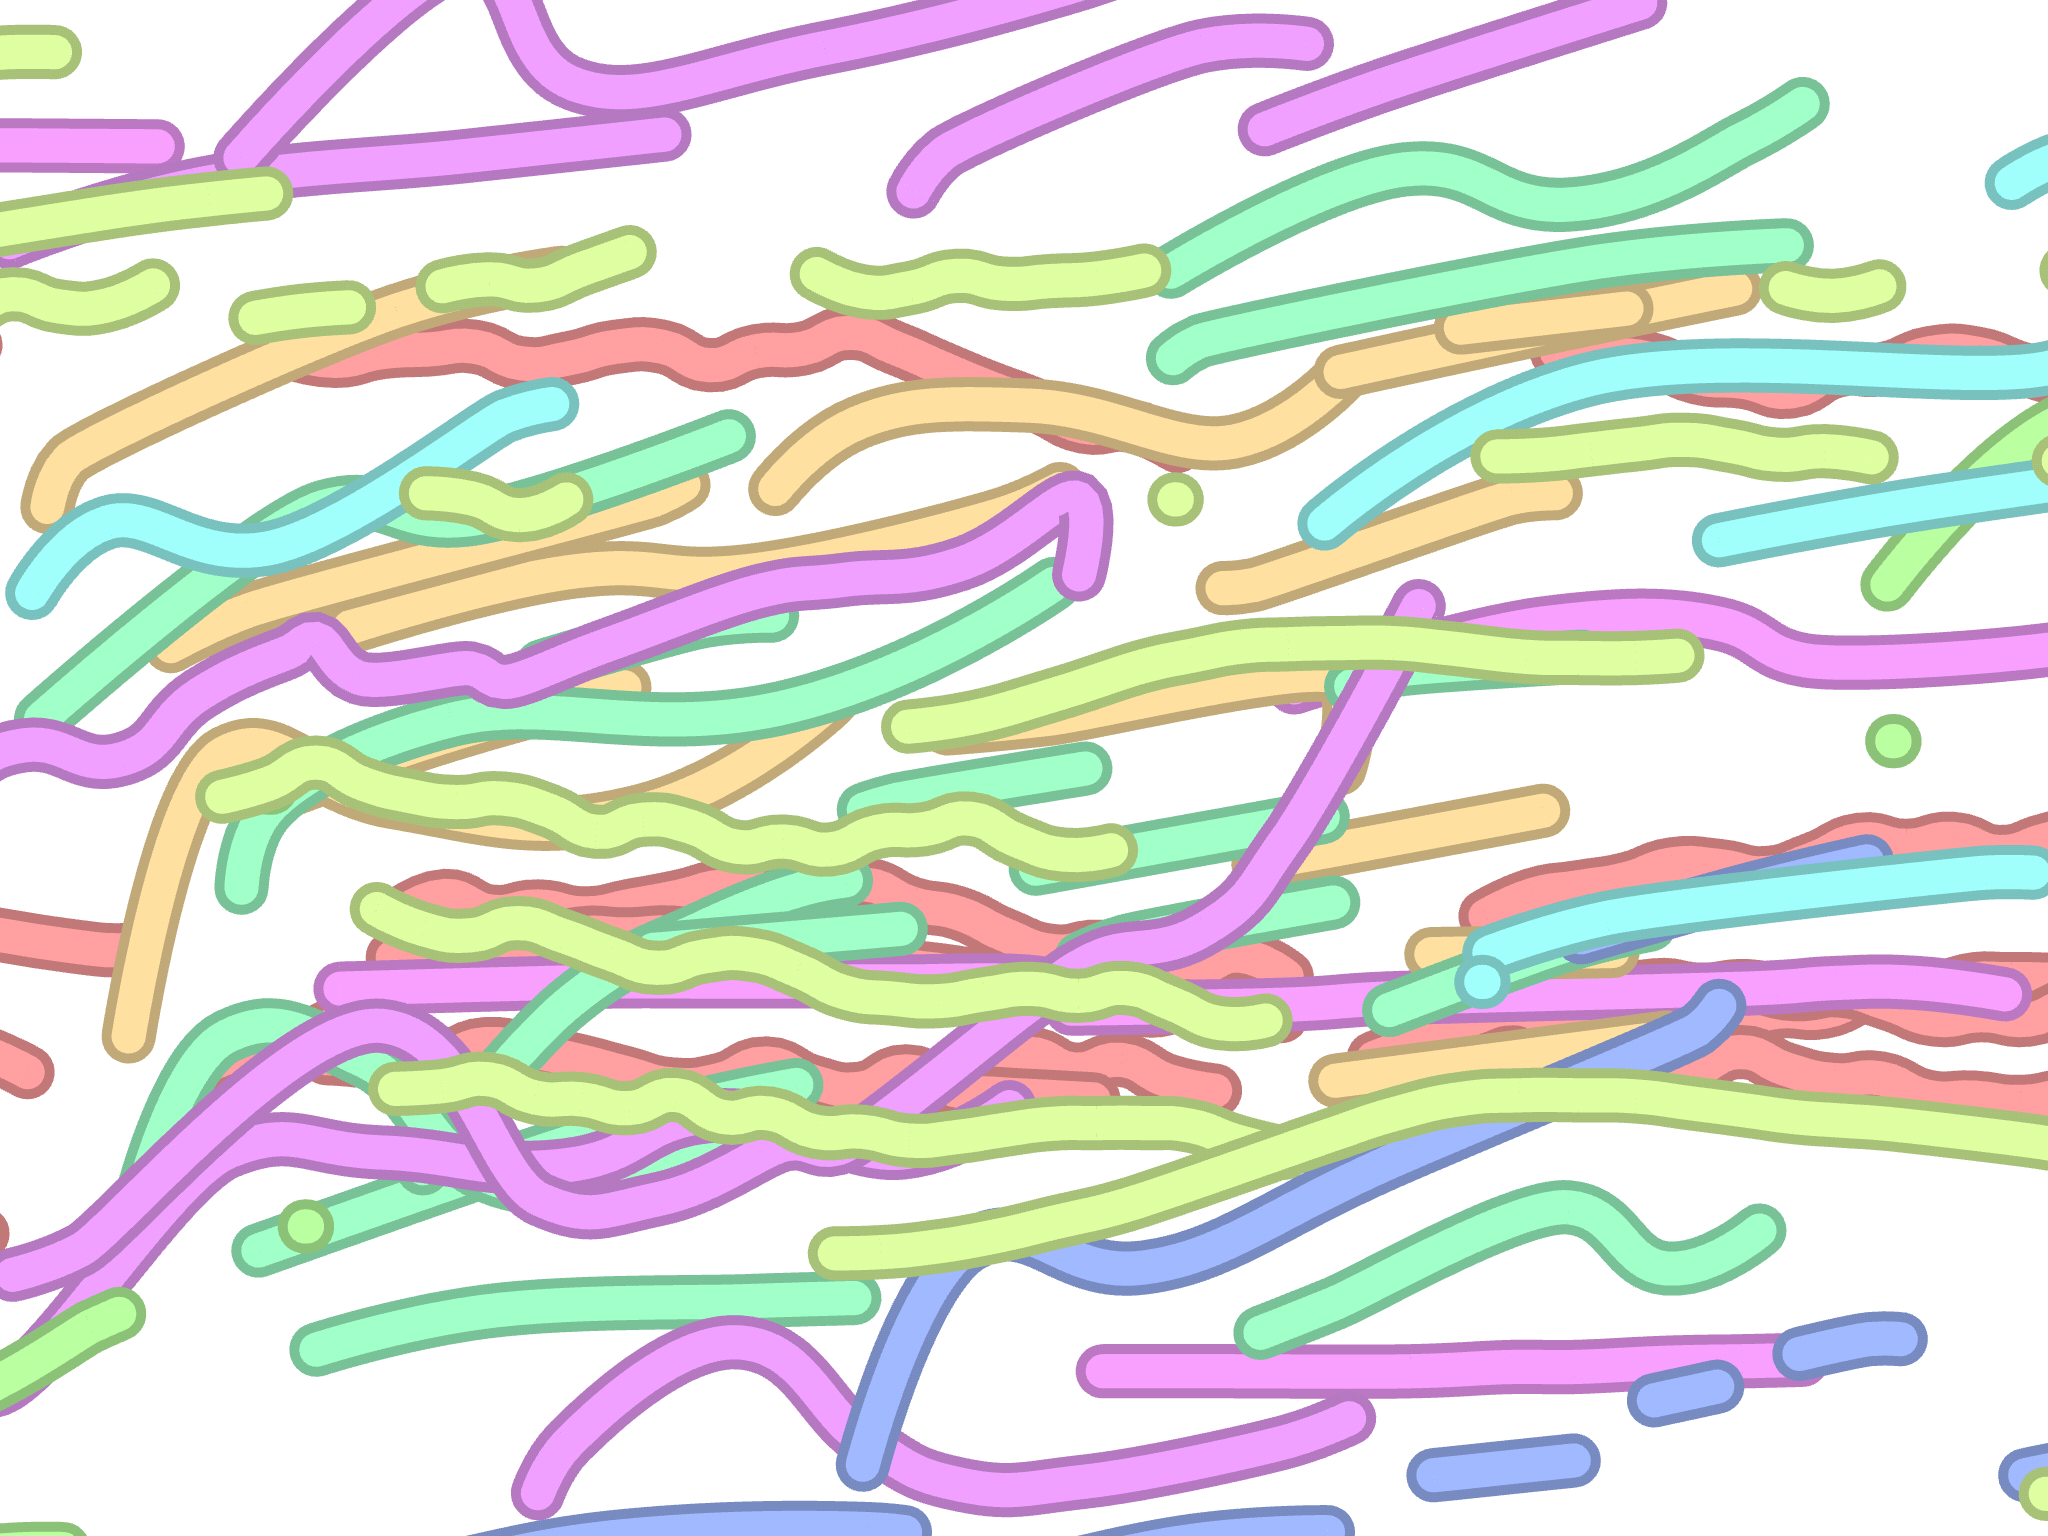
Having figured out how to use both frameworks, I made a quick performance prototype: a simple draw loop at 60fps with a set of full-screen, randomly generated Bézier curves in each frame. (I considered this my worst-case scenario, as in the case of changing the width or height scales of my grid.) There were two rendering paths: one for CoreGraphics and one for MonkVG.
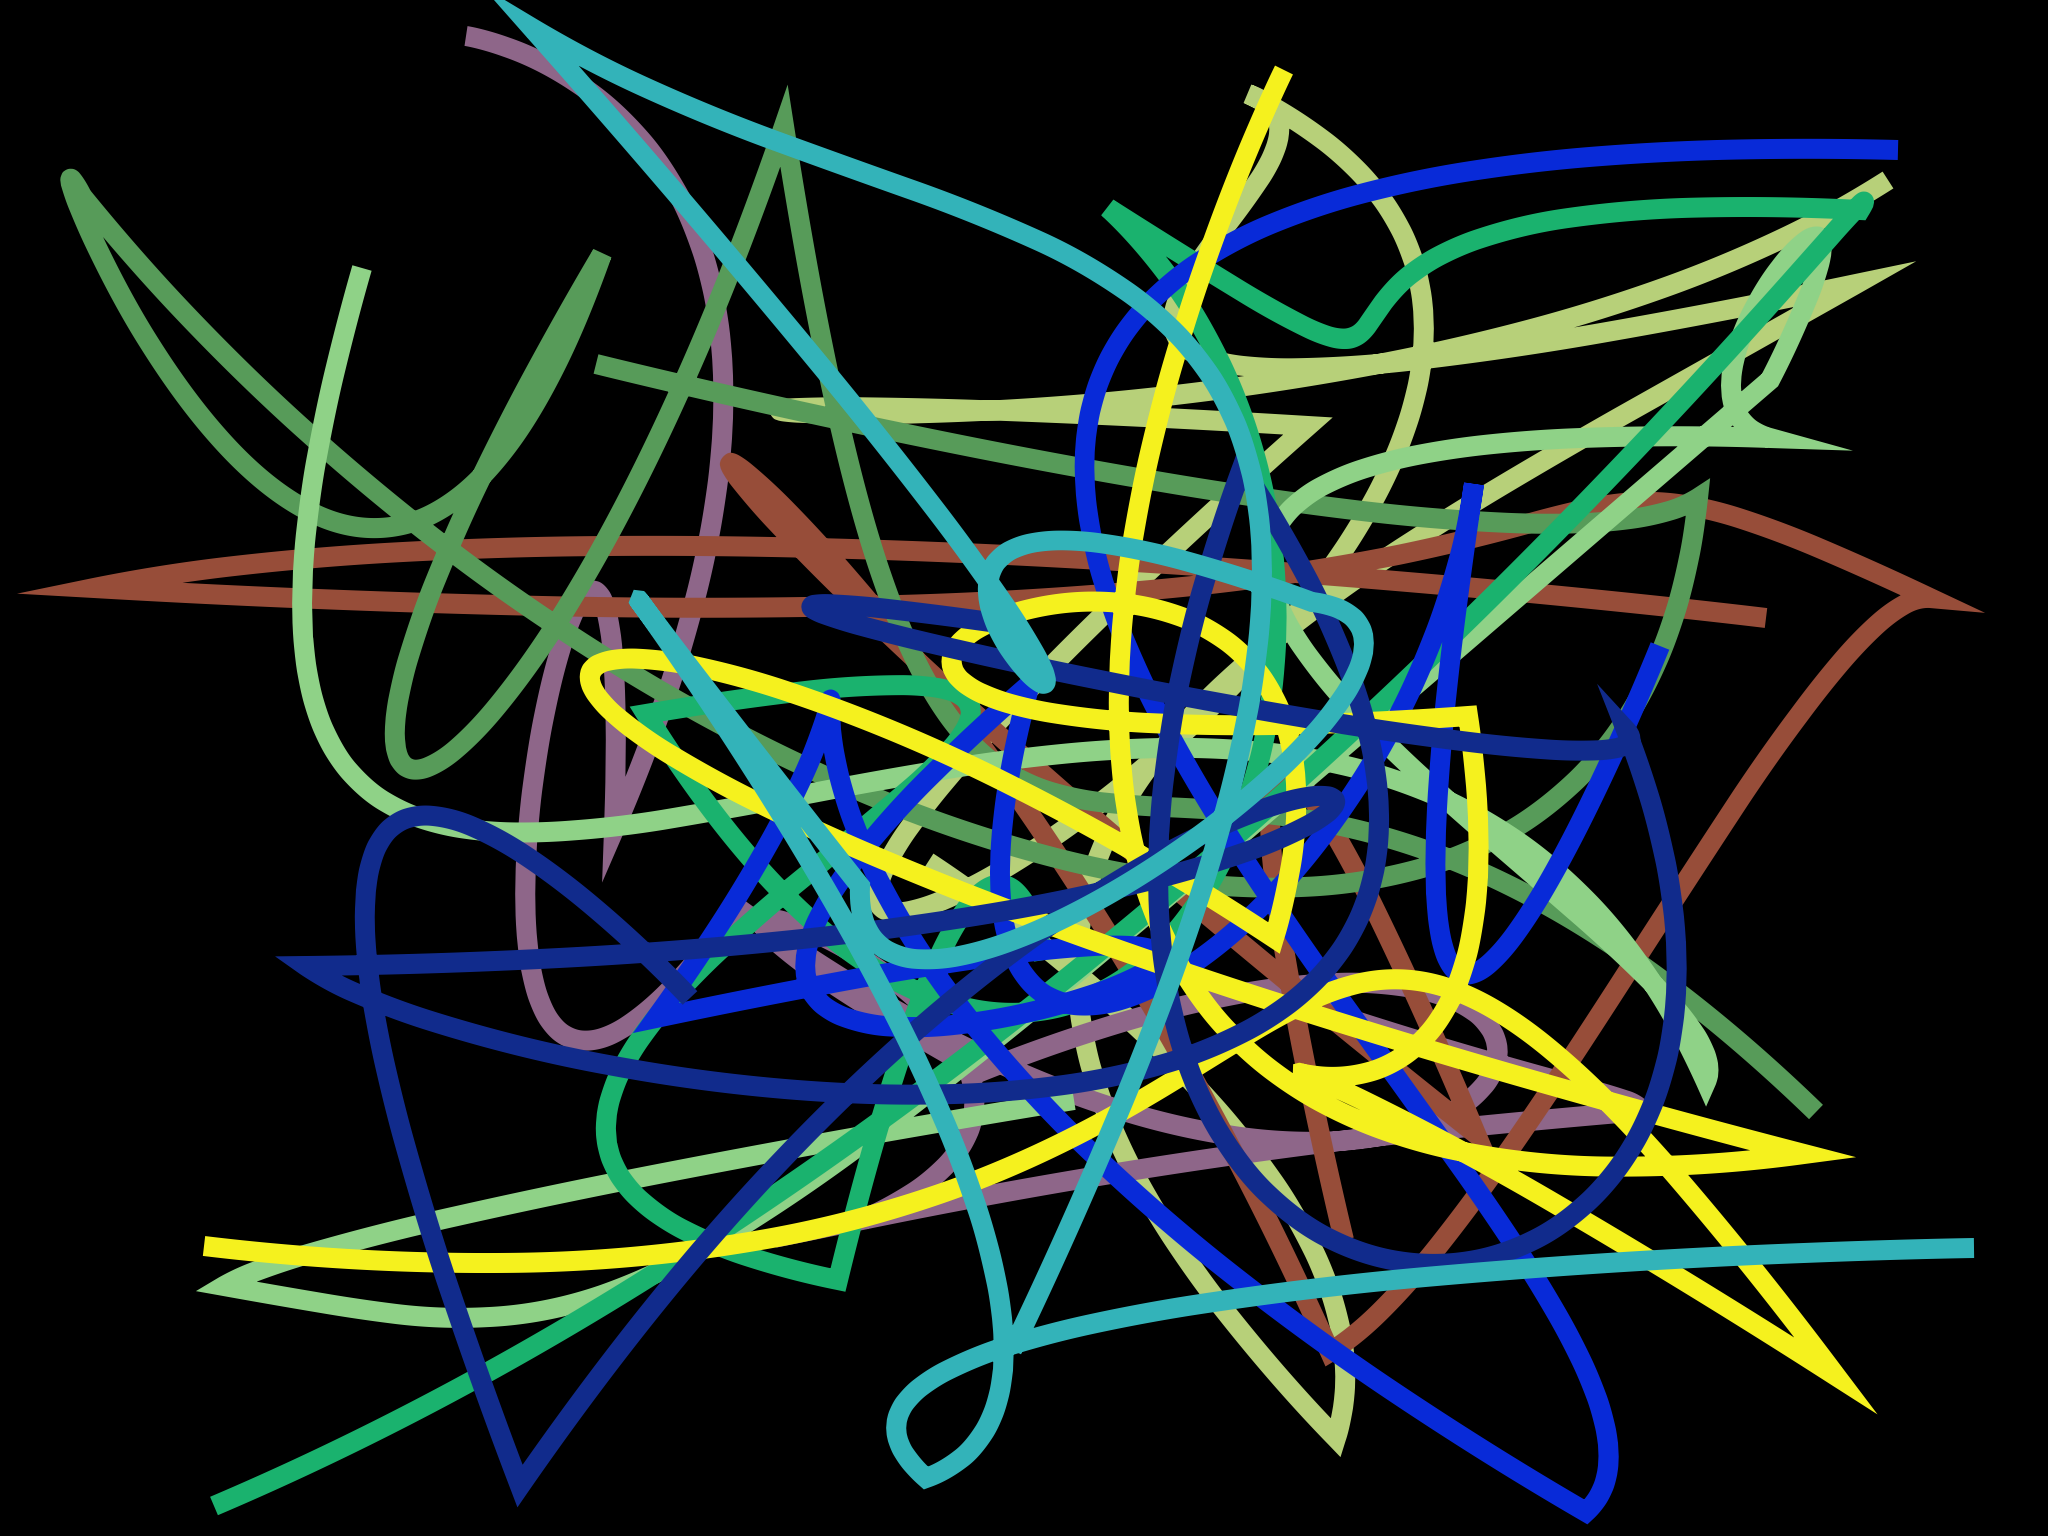
A randomly-generated scene from the stress test. CoreGraphics couldn't handle it while MonkVG passed with flying colors.
Sadly, as much as I wanted to stick with the battle-hardened CoreGraphics approach, it wasn’t even able to draw a single animating curve at a solid 60fps on my iPad 3. MonkVG, on the other hand, tore through 10+ curves without breaking a sweat. Graphically, the results of both approaches looked quite similar to me — or at least good enough for the app I was trying to make.
After closely examining the technical underpinnings of both technologies, I learned that CoreGraphics was doing all of its work on the CPU, while MonkVG was tessellating its curves into polygon strips CPU-side and then sending them to VBOs on the GPU — one per curve. Interestingly, the performance difference still applied even when accounting for the tessellation step. Presumably, this is because drawing multiple polygons is a very fast and parallelizable operation on the GPU, even if they number in the thousands, while generating a Retina-sized Bézier curve on the CPU requires you to touch tens of thousands of pixels by “hand”. (But don’t quote me on that — I am definitely still a novice in this area.) It also helps that MonkVG is much less precise than CoreGraphics in its tessellation.
Despite these finds, I really wanted to work with CoreGraphics, and so I attempted to return to the technology a number of times during my project. (Perhaps I missed something that would account for the massive performance difference?) Notably, I tried using it together with CATiledLayer, hoping that this particular optimization would offset the inefficiencies of the software render. But even though I could now pan and zoom at 60fps, the chunks loaded far, far too slowly for realtime use — I’m talking on the order of several seconds whenever you zoomed in. So that was that.
For much of the project, owing to my inexperience, I was burdened with the question of the framerate cap. If everything was done perfectly, how high could I go? After getting caching and draw call batching working correctly, my MonkVG implementation yielded an acceptable framerate of 30-60fps in the general case, but I still wondered if I was an order of magnitude off on account of my incompetence. How did Apple Maps manage to work so smoothly with so many shapes on screen? How did web browsers manage to display thousands of character paths — possibly with transforms! — and still attain smooth performance? In truth, the geometry I was showing on screen was fairly complex: each quarter-measure note had about 300 triangles once you included the outline and endcaps, leading to an upper bound of almost 400,000 triangles on screen for a dense piece (12 notes, or 4 chords, per measure per layer, with 10 full layers and 10 measures on screen). Surely a breeze for modern machines, but quite a lot to handle for an old iPad! It’s always important to be able to answer the question, “where is all that performance going?”, and in my case it was going towards the multitude of dynamic features in my app.
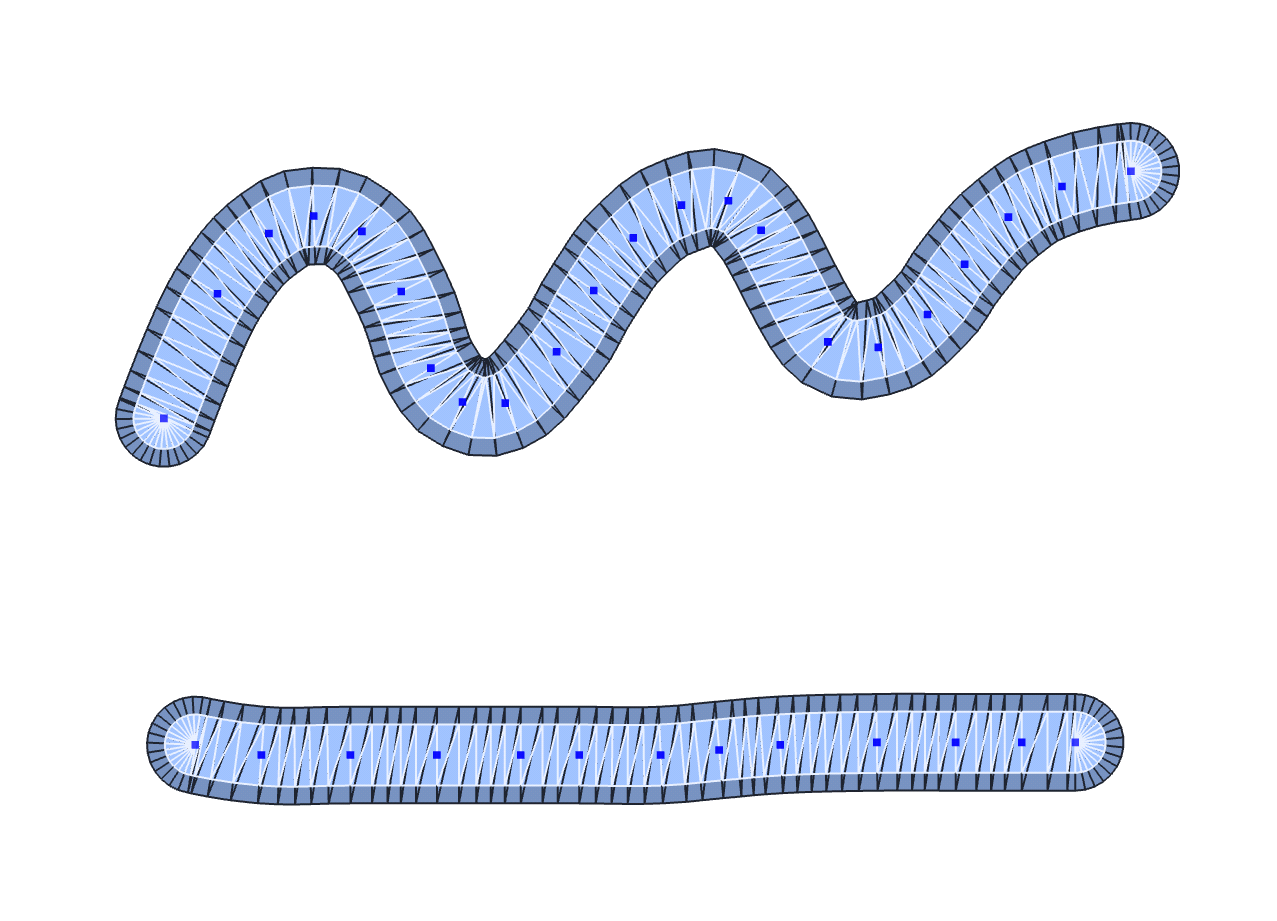
The mesh structure of a note. Each blue dot is a recorded time/pitch sample. Having a screen full of these can be surprisingly performance-intensive!
In retrospect, it was quite fortunate that I just happened to fall into the optimal rendering implementation for my project. My path rendering requirements were a little different from the norm: after eliminating point #5 from my initial goal list, I no longer needed most of my curves to be dynamic. The only curves that actually changed their structure from frame to frame were those belonging to the notes currently being drawn or erased — and even those were localized to the point of editing, since my notes were comprised of multiple tiny Bézier segments chained together. (I’ll talk details in a later article.) Instead, my highest priority was to translate and scale my notes at a constant 60fps while still preserving their sharpness, and polygons happened to be uniquely qualified for this task. At the expense of jaggedness on close zoom — fine by me — polygon tessellation effectively gave me infinite resolution along with free transforms. They were also perfectly suited for caching: once tessellated, I could store the vertices of the generated polygons for all my note objects without wasting too much space, wheareas doing the same with textures would have quickly filled up my memory. (To say nothing of looking terribly ugly when scaled.) Better yet, I eventually learned from profiling that it was the tessellation step — not drawing — that was the biggest roadblock in my path rendering implementation, so caching was absolutely critical to getting the performance I needed! Had I used a shader-based approach, I would have had to write a ton of additional code to enable caching, and it still probably wouldn’t have gotten close to my 60fps benchmark for large scenes.
For convenience, I decided to use Cocos2d as the graphical core of my project, so I had to figure out a way to wedge MonkVG in there somehow.
Fortunately, it was fairly simple to write a Cocos2d CCNode wrapper around MonkVG’s rendering functions, since each CCNode in Cocos2d had a lovely overridable draw method that allowed you to call OpenGL functions directly. (One reason why you might want to use it over SpriteKit!) Still, especially as the project moved forward, the framework was becoming a massive cognitive burden. MonkVG had a fairly old and creaky codebase, and as the hacks I made to enable unsupported features such as real-time color changes piled on, I realized that it would take me forever to actually fix everything up and integrate it into my project in a sensible and modern way. Additionally, the one-VBO-per-curve approach was quickly becoming unwieldily. Already I had to synchronize a ton of state between MonkVG and the rest of my app in order to cache previously-tessellated curves for performance reasons; far more daunting was the idea of cycling VBOs in and out of GPU memory while retaining the underlying geometry client-side, which I wasn’t doing yet. Unfortunately, this was going to be necessary to enable my potentially-infinite canvas, and MonkVG didn’t natively support it.
At this point, I realized that even though writing my own hardware-accelerated path renderer was probably too much work, my path rendering needs were actually very simple. I didn’t need to create unions of shapes, arbitrary curves, or even strokes! All my note shapes were simple Bézier “tubes” with round endcaps and outlines, and so creating a super-simple note renderer for direct use in Cocos2d would require minimal effort. Better yet, most of the work was done already: for the purpose of creating better outlines, I was already interpolating all of my Bézier curves myself and only using MonkVG to draw and tessellate the final polygon tubes from the perimeter vertices. The only thing I needed to do was to create polygon strips from my points and send them through Cocos2d’s native rendering system, as well as to write a bit of code for the round endcaps. Sure, it bummed me out that this would preclude me from creating more complex and dynamic shapes in the future, but I was on a deadline and the project needed to be shipped. Despite my initial trepidation, the process was extremely quick and only took a couple of days of work.
As I dove deeper into Cocos2d’s architecture, I was struck by the beauty of its rendering pipeline. Unlike MonkVG, there was no VBO juggling here at all: the geometry for each object in the entire scene graph was sent to the GPU anew in every frame. (I soon learned that this was called “geometry streaming”.) This approach completely eliminated the need to track the mapping between tessellated curves and their corresponding VBOs, eliminating hundreds, if not thousands, of lines of brittle complexity in my app. What’s more, Cocos2d batched draw calls automatically, meaning that all your geometry would automatically coalesce into just a couple of draw calls without having to do any extra work, even if it resided in completely separate CCNodes. This was a massive benefit I was not expecting!
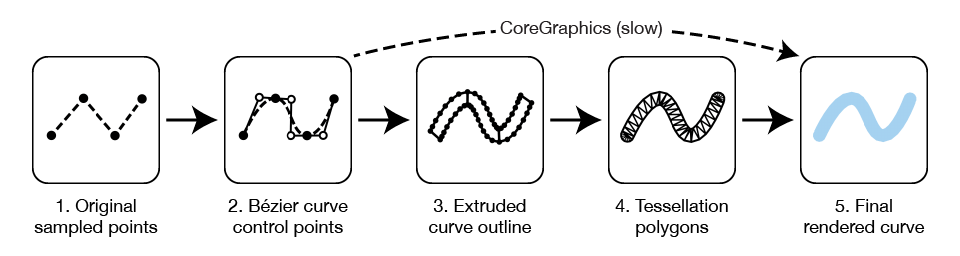
The final path rendering pipeline.
There was a new problem, though. With the new path rendering system (now using geometry streaming), my performance hovered at around 50%-70% of what I was getting in MonkVG. Intuitively, I feared that a fix was impossible: wouldn’t uploading thousands of polygons in every frame be naturally more resource-intensive than storing polygons in VBOs for later reuse? But after some digging, I learned something very interesting: OpenGL ES actually allowed you to map GPU memory directly into a shared application-space buffer, eliminating the need to “upload” your geometry at all! I did a sanity check and realized that there was no way that copying even hundreds of thousands of polygons to a buffer could be the roadblock. But Cocos2d was already using memory mapping in its renderer! So what was the problem?
There was another issue with the Cocos2d renderer. If I opened a project with lots of notes, my performance was usually 60fps at the default zoom level. But if I zoomed out (getting lots of notes on screen) and then zoomed back in, the performance dropped to 30fps or lower and then never actually recovered, no matter how closely I zoomed! This didn’t make any sense since my notes were always culled to the current viewport, meaning that performance should have always been identical for any given view. This also never happened in MonkVG.
I decided to dig even deeper. After several hours of Googling keywords related to geometry streaming versus VBO performance, I zeroed in on a fantastic thread in the OpenGL forums. In this thread, Rob Barris provided a very clear rundown of exactly how OpenGL managed memory in streaming situations. As it turned out, there was a certain art to managing your geometry buffers in a way that avoided stalls in the pipeline.
Digging around in Cocos2d’s renderer, it seemed that the streaming architecture had some inefficiencies and bugs. There was a single memory-mapped buffer that was used for all the geometry, but it got “orphaned” and subsequently re-allocated in every frame. This caused a continuous allocation of up to several megabytes per frame — a significant performance consideration. What’s more, if a given scene was big enough to fill up the buffer, it expanded in place, but then never actually shrank back to its original size once the extra space was no longer needed. This meant that if you happened to render a giant scene — say, requiring a 9MB buffer — you would get an allocation of 9MB in every single frame after that, regardless of its complexity!
At this point, I had a solid intuition for my next course of action. Rob Barris’s advice, as well as some other references, indicated that it was possible to use the same buffer over the course of several frames without having to reallocate it. You could simply keep a pointer to the last filled slot in the array and start from there for your next frame. Once you ran out of memory, you could orphan your buffer and have OpenGL allocate you a new one. If you set your sizes correctly, you’d have one large allocation every few frames instead of an allocation in every single frame. In the end, I opted for a slightly simpler (architecturally-speaking) double-buffer solution: two large buffers side-by-side, with one buffer always serving as the main buffer. Once the main buffer ran out of space (over the course of several frames), the other would become the main buffer and allow the first buffer to orphan and reallocate.
Fixing the renderer required a number of very low-level changes, but it was somewhat easier than expected, largely on account of Cocos2d’s excellent code organization. After making my changes and fixing a couple of Cocos2d bugs along the way, I fired up the app and was delighted to see my old MonkVG framerate — maybe even a little better! Not only did I have my original performance back, but I also gained an immense amount of architectural simplicity along the way.
In the end, all the goals I set for myself were successfully met. The app does run at 60fps much of the time on my iPad 3, though it’s naturally far more prone to dropping frames than newer devices. (An iPad Air 1 and my iPhone 5s barely dipped below 60fps even in complex scenes.) Real-time tessellation is still something I want to implement for grid scale changes; I doubt I’d be able to truly do it in real-time for a full screen of notes, but I can think of several ways to fake-transform existing tessellated notes while waiting for the correct tessellation to load.
Finally, I do hope that somebody releases a stable, hardware-accelerated path rendering framework for iOS. It’s sorely needed for vector-based apps with dynamic content!
-
Curious, I asked programmers.stackexchange.com about this issue and got some interesting answers. ↩︎
—Archagon
February 27, 2016